Jump to content

HID Headlight Bulbs / HID Projector Retrofit


Recommended Posts

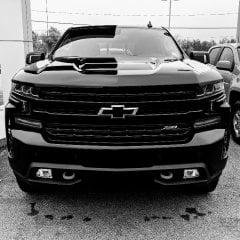
My 2015 Sierra. G5-R, CBI, Hylux 35watt. When you attach the bracket to the headlight there is a little play with the screw holes so my drivers side seems like it has to be rotated counter clockwise a little bit. Over all the light output is amazing. CBI's are a little warmer than my morimoto fogs, CBB's would probably match a little better. 


25ft from garage door


20190824_205427.thumb.jpg.dfa8b0590396d504a8a6fa3937d92a85.jpg


20190824_205433.jpg

Edited by BlackZ71SLT
Link to comment
Share on other sites

Hey guys

For some reason the discount code at Fastheadlights wasn't working. I fixed it and it should be good to go now. It can be used on HID kits and Retrofit kits. Just a note, the FXR projector is being discontinued and will no longer be offered. The D2S 5.0 essentially has made it obsolete. Farewell FXR, it's been real. Lol.
Discount code is gm_forum10%

Enjoy

Sent from my SM-N950U using Tapatalk

  • Thanks 1
Link to comment
Share on other sites

https://www.fastheadlights.com/product-p/buy_hid_kit.htm

This kit is much better than the Morimoto Elite kit. The Morimot kit requires a relay harness and to be honest the 35 watt igniter/ballast from Morimoto have been very unreliable. I stopped selling the Morimoto Elite system because I was going crazy with troubleshooting and processing warranty claims. The Hylux ballast is much simpler and has been far more reliable. Its asplug n play as it gets.

You can also upgrade your fog lights to the Morimoto XBLED fog lights to improve output and beam distribution. Those are listed on the site above as well. They are also plug n play.

Sent from my SM-N950U using Tapatalk


If I already have the HID kit from TRS, can I buy just the Hylux ballasts to replace my morimoto ballasts? I’ve have them kit installed for about a year and a half and have went through 3 ballasts so far and one bulb. Plus for the price of your kit, I can get a whole new kit for the price of the parts from TRS.


Sent from my iPhone using Tapatalk
Link to comment
Share on other sites


If I already have the HID kit from TRS, can I buy just the Hylux ballasts to replace my morimoto ballasts? I’ve have them kit installed for about a year and a half and have went through 3 ballasts so far and one bulb. Plus for the price of your kit, I can get a whole new kit for the price of the parts from TRS.


Sent from my iPhone using Tapatalk
Yes you can. The Morimoto bulbs work great with the Hylux. No need for the relay harness either.

Sent from my SM-N950U using Tapatalk

  • Like 1
Link to comment
Share on other sites

On ‎9‎/‎1‎/‎2019 at 8:18 AM, FastWS6TA said:

Yes you can. The Morimoto bulbs work great with the Hylux. No need for the relay harness either.

Sent from my SM-N950U using Tapatalk
 

For the HID kit shown on your website, are there any install videos available or an instruction sheet?  Curious how this kit is installed.  Thanks.

https://www.fastheadlights.com/product-p/buy_hid_kit.htm


Link to comment
Share on other sites

Just ordered the retrofit kit from Fast Headlights for my 14 LT. Also picked up a set of LT headlights to retrofit off of a buddy for cheap so I can take my time putting this all together. I'll make sure to take lots of pictures and post them when I'm done.

Link to comment
Share on other sites

  • 3 weeks later...

So started this project the other day and I said I would document it. Below are the headlights I got off a friend for a good deal.

spacer.png


Here is the kit from Fast Headlights 

spacer.png

spacer.png


First things first, remove the trim. Used a head gun and flat head to pry them off. Had to be careful about the tabs

spacer.png


A couple nights later I had the time to crack them open. I did 270°F for 15 minutes at first, then put them back in at 5 minute intervals after that.

spacer.png

spacer.png


All in all it took me roughly 2 hours to split the headlights. The first took me about 1.25hrs because I wanted to make sure I wouldn't mess them up. Second set went much quicker.


That's all for right now. Next step is to clean out as much of the sealant as I can and then mount the projectors and test them.

Link to comment
Share on other sites

So started this project the other day and I said I would document it. Below are the headlights I got off a friend for a good deal.
0lOvmbL.jpg
 
Here is the kit from Fast Headlights 
PPJYPyi.jpg
aIL0H8X.jpg
 
First things first, remove the trim. Used a head gun and flat head to pry them off. Had to be careful about the tabs
6WjKgqA.jpg
 
A couple nights later I had the time to crack them open. I did 270°F for 15 minutes at first, then put them back in at 5 minute intervals after that.
YRtuswX.jpg
LnHJEuM.jpg
 
All in all it took me roughly 2 hours to split the headlights. The first took me about 1.25hrs because I wanted to make sure I wouldn't mess them up. Second set went much quicker.
 
That's all for right now. Next step is to clean out as much of the sealant as I can and then mount the projectors and test them.
You got thr hardest part out of the way. Just be real tedious with cleaning the channel. Keep tossing it in and out of the oven to keep the permaseal hot and it will crumble. When we clean them out we get it all out. Right down to the bare plastic channel.

Sent from my SM-N950U using Tapatalk

Link to comment
Share on other sites

On 9/20/2019 at 12:06 PM, FastWS6TA said:

You got thr hardest part out of the way. Just be real tedious with cleaning the channel. Keep tossing it in and out of the oven to keep the permaseal hot and it will crumble. When we clean them out we get it all out. Right down to the bare plastic channel.

Sent from my SM-N950U using Tapatalk
 

Thank you for the advice. Yeah this stuff is really stuck in there without some heat.


Another question I do have: when inserting the projector into the bulb hole in the housing, there is a lip on the back side of the housing that makes it almost impossible to screw on the projector nut. Do you guys usually trim this off to be able to tighten the nut?

Link to comment
Share on other sites

Thank you for the advice. Yeah this stuff is really stuck in there without some heat.
 
Another question I do have: when inserting the projector into the bulb hole in the housing, there is a lip on the back side of the housing that makes it almost impossible to screw on the projector nut. Do you guys usually trim this off to be able to tighten the nut?
Yes, you need to grind it down flush so you can get the nut screwed on. Dont forget to grind down enough so you can also get the bulb holder on too.

Sent from my SM-N950U using Tapatalk

Link to comment
Share on other sites

I just got a kit from fastheadlights, and when I got it all back together the lights wouldnt light. I feel like since neither side worked I must have done something wrong, but, its seems pretty idiot proof, plugs only go in one way for everything.

I've read some wires are sometimes backwards, what do i need to check? Any suggestions?

Link to comment
Share on other sites

I just got a kit from fastheadlights, and when I got it all back together the lights wouldnt light. I feel like since neither side worked I must have done something wrong, but, its seems pretty idiot proof, plugs only go in one way for everything.
I've read some wires are sometimes backwards, what do i need to check? Any suggestions?
Hey Ben
It is definitely the wires being reversed. Flip thr plug over on the ballast and if it lights up you got thr issue identified. If that doesnt work then be sure that the plugs inside the headlights are fully seated. A bad connection will result in no light either.
Email me at [email protected] if you have any other trouble or need a phone call to help.

Sent from my SM-N950U using Tapatalk

Link to comment
Share on other sites

Join the conversation

You can post now and register later. If you have an account, sign in now to post with your account.

Guest
Reply to this topic...

×   Pasted as rich text.   Paste as plain text instead

  Only 75 emoji are allowed.

×   Your link has been automatically embedded.   Display as a link instead

×   Your previous content has been restored.   Clear editor

×   You cannot paste images directly. Upload or insert images from URL.


×
×
  • Create New...

Important Information

By using this site, you agree to our Terms of Use.