Search the Community
Showing results for tags 'LED'.
-
I'm wanting to add some additional light on the back of my 2023 2500 AT4. So, I've purchased a CURT (56584) 7way T with a 5way plug as well a set of Rough Country 6" slim light bars (97026B) for a side by side. My thoughts were to add the 7way T so I didn't have to cut or tap into any factory wires and then wire the lights to the 5way reverse wire. But after getting the lights from Rough Country today, I'm a bit confused on how I can do this. The light bars come with a wiring harness that includes a relay, two wires plugs for each light, a battery +/- leads and a on/off switch (which I don't want since I don't want to turn them on/off by switch but when the truck is in reverse). Any suggestions on how I could make this work?
-
 So I installed a set of "plug'n'play" high and low LED lights on my Custom Trail Boss 2024 and even though I was told by the manufacturer that a lot of clients installed it without any problems, I got an kind of hyperflash or fast flicker ONLY when the truck get in auto stop and then restarts. So I contacted the seller and he told me that even though it was strange because it was the first time he heard that, I should install an anti-flicker module, which I did. However, even with the anti-flicker module, I still get the hyperflash when the truck restarts after an auto start/stop. The rest of the time, everything work fine. Anybody already had a similar issue and/or have any ideas? Thanks for the help!
 -
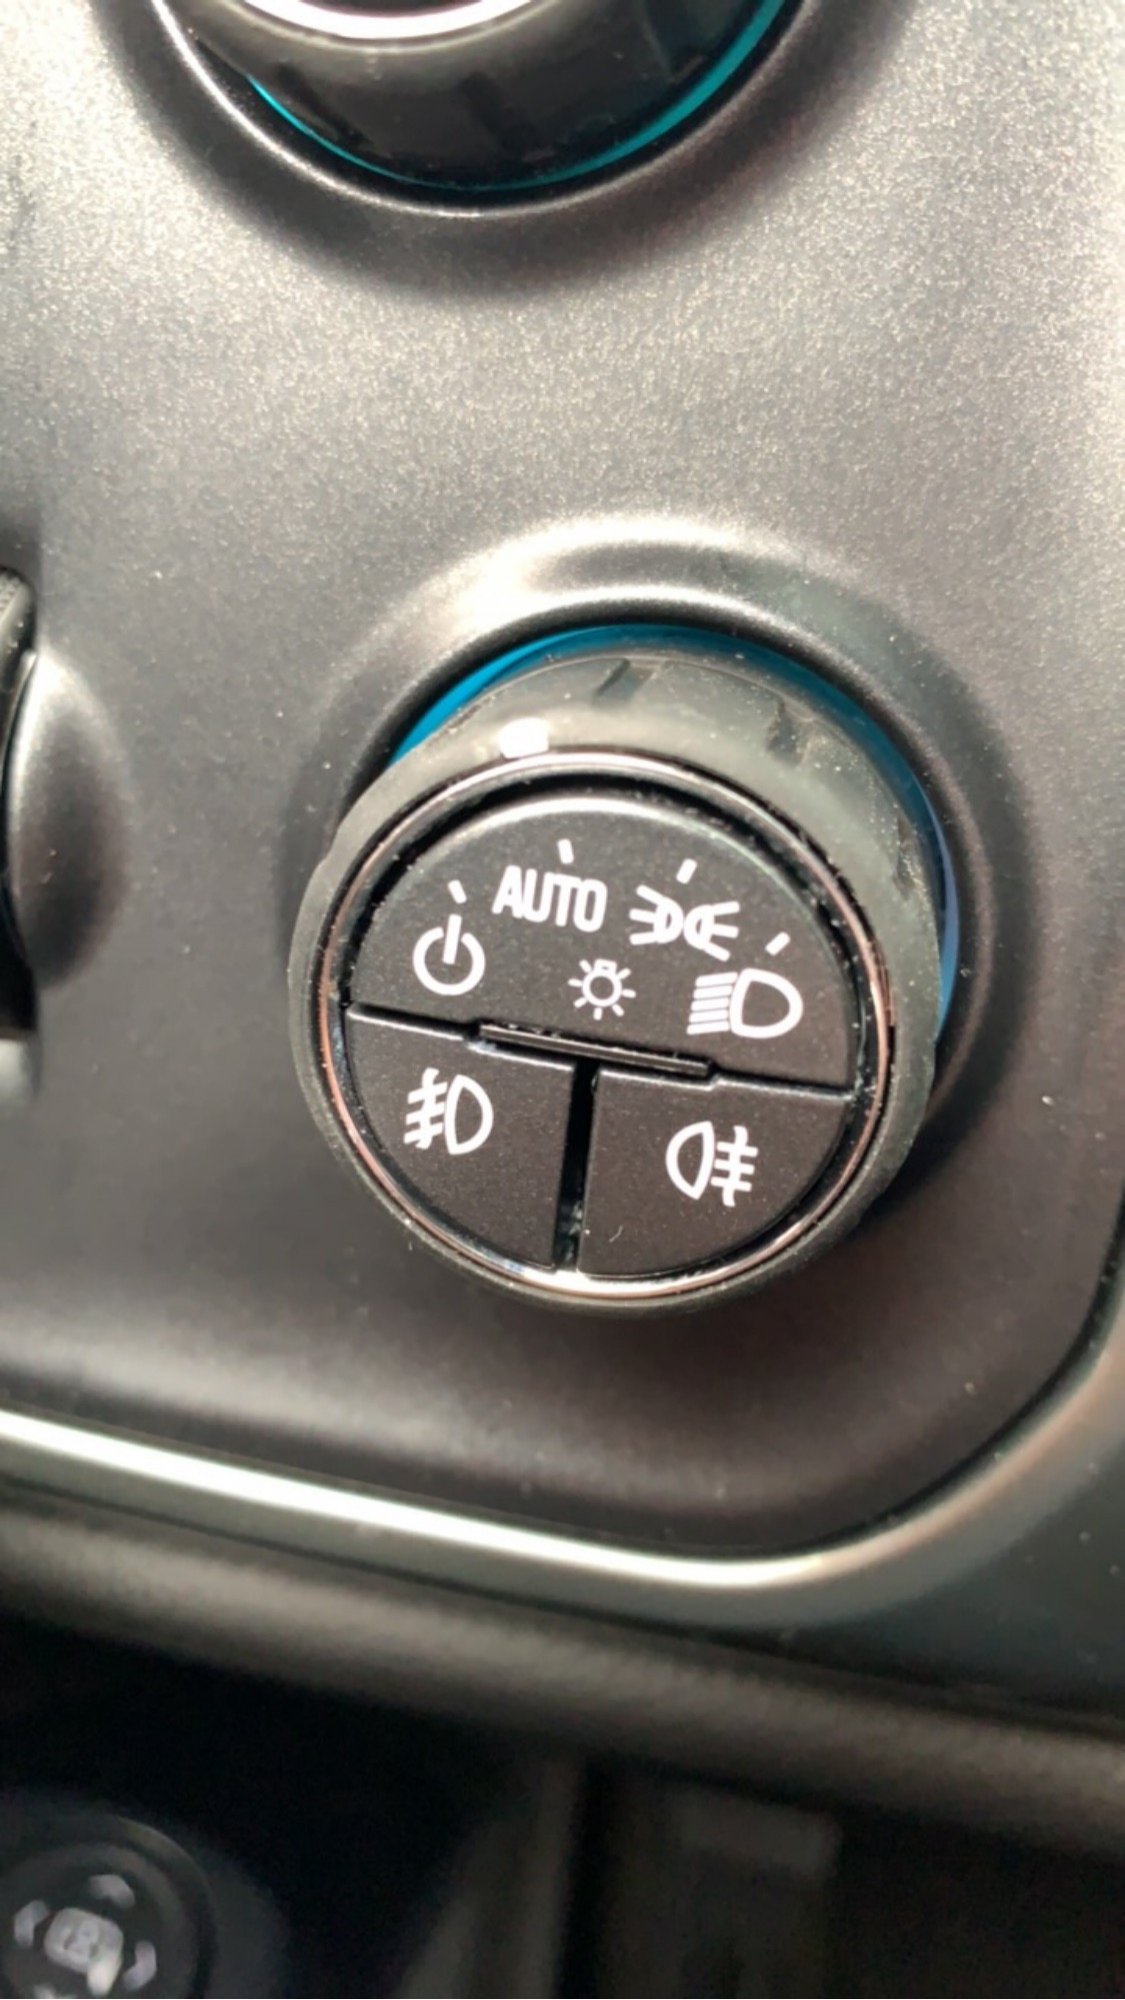
Have you seen the Michael J Fox Edition Sierra/Silverado rolling down the road? Looks like the Toyota from Back to the Future. Anyway there is a really cool headlight switch with the option for Off-Road lights. Apparently with a long push of the button the BCM will latch the signal and provide a constant positive signal for triggering a relay. It will also illuminate the icon on the switch as well as send a signal to the cluster illuminating an amber light icon next to the fog light icon or “ORL” in amber. I successfully installed this in my wife’s ‘16 2500 Denali yesterday but from what I’ve read it’s the same for 1/2 tons, HDs, and Colorado/Canyon. The BCM already has Programing for this from the factory but I’m not sure when (how early) it was started. I have a ‘15 3500 that I’ll try soon as well as a friend’s ‘17 2500 to do soon. If the Programing hasn’t been done in my ‘15 I’ll still be able to get the switch to illuminate as well as latch a signal for positive or negative relay signaling using a latching relay. There are several variants of this switch. Some have blue background for ‘17+Up model years and red for ‘16+earlier. Additionally some have the ORL switch without Fogs, and some have no surround backlighting. Here is the video from yesterday’s install..... ......More videos to come for other uses like work lights, incorporating into the X50A, rear facing lights, non programmed trucks..... Pgamboa has been very helpful in discussion about this as well as providing schematic-Thank You!
- 473 replies
-
- 12
-

-

-
- headlight switch
- led
- (and 2 more)
-
 Hey, I was wondering if anyone has any luck finding aftermarket tailight replacements for the 2014 sierra 1500 with OEM factory LED tailights. Literally very very rare to find. Only ever find Halogen replacement. OR is there a way to fit the Halogen OEM setup into the truck?? I've looked everywhere. No straight answers. The problem I have is I bought the truck used in 2016 at 36k. The goof that had it before installed some aftermarket tailights that worked with LED factory harness, which I believe are these ones: https://www.tdotperformance.ca/products/spyder-automotive-5080707-led-tail-lights-black-smoke.html?gad_source=1&gad_campaignid=16186571898&gbraid=0AAAAAD1t1bWUgzQKgfKbn9BDfh-URpODA&gclid=Cj0KCQjw953DBhCyARIsANhIZoZzYyW4UlpMKUR-oso_Wagh_SW8lo3LMvtlENuPAXInfryh5Cdp_dsaAtTHEALw_wcB#2014-gmc-sierra_1500?utm_source=google&utm_medium=cpc&utm_campaign=ToF_Search_PerformanceMax_&utm_term=_ The resistors on PCBs rotted out and I managed to find the same ones at a wrecker 4 years later. Started with hyperflashing developing in high heat conditions. Well low an behold, the replacements I put in are doing the same now. I need a fix. Because tailights that fit factory LED are so hard to find I tried to see what it would take to change the truck over to OEM Halogen harness. Is it just a wiring harness?? Or does BCM need flashing aswell? I've called dealers and they want diagnostic fee.. Parts guy told me BCM needs flashing possibly but didn't know forsure. GM technical support says "We recommend you don't alter your vehicle from factory." thanks GM... Any help would be greatly appreciated. I'm at my wits end and I don't want hyperflashing anymore.
 -
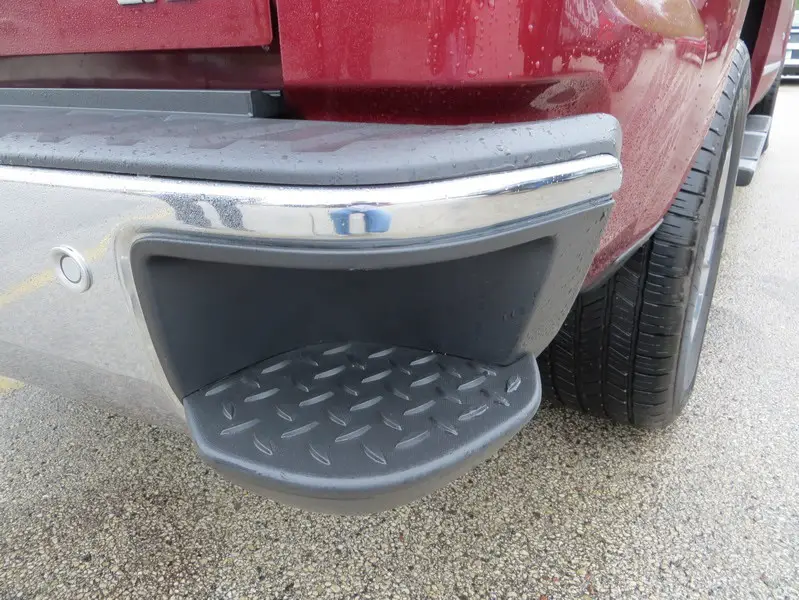
 Hello all, I have searched for ideas on this, and only found a few people who installed "mood lighting" inside the bumper step. I'm wondering how simple or effective it would be to get some real reverse flood lights inside the bumper step? I know you could fill the whole cavity with a tractor light and it would work, but I'd like to still be able to use the step if I need it. So has anyone installed an LED flush mount or similar light that actually throws enough light behind them to use for backing up/ doing work? How does it fit inside the curved surface of the step? The reason is I want the ability to have light behind me for plowing snow. I already replaced the factory reverse and cargo bulbs with LEDs, I think they work fairly nice, but they throw really straight back like a spotlight. I'm hoping to have a little wider path lit up. I don't want to cut the bumper or have lights hanging down below the bumper, but I know those would be alternative options. I know there have been a lot of creative people adding auxiliary lights to their trucks, so I'm hoping someone can show how you were able to do this.
-
okay you guys i know this might sound odd but i am trying to find some led lights to replace the park sensors on my new bumper. the reason is it is a bumper replacement bumper and it is only made with the holes pre-drilled and my pickup is NOT equipped with the park sensor feature. i have looked every where trying to find the size of the holes so that i can kinda narrow down my search but i am not having any luck. i am hope maybe yall have some knowledge to lend me. thank you in advanced!!
-
 Every other truck has that led strip at the bottom of the tailgate, haven't personally seen anyone put one in the middle of the ones equipped with the multiflex tailgate. Always wanted to do this but my old T1 had the alternate one with the "Chevrolet" lettering. Idea is simple the strip goes in the middle, has turn signal functions and a running light. Hope one day someone will figure out one that's able to bend, is equipped with a reverse light, and a brake light. I tried first with the regular tailgate strips but those don't bend easy also light doesn't get through at all. This strip is meant for the hood thus shoots the LED light through the bottom, this allows me to slightly expose the strip on the bottom through the gap and let light shine brightly. You'd think it would look bad but after putting tint over it, it's hardly noticeable (maybe because my truck is that dark mineral grey). It's spliced to the running light on the 7 way trailer wire and the turn signals are spliced into the taillights. Love to hear some feedback I personally love it and I think it's unique, maybe a little "Ford-ish" I believe the new f150s come with a strip in the tailgate but hey people put side exits by the door on silverados and the Lighting definitely started that so here we are. Below are 3 links to YouTube videos on examples of the strip.
-
To all the GMC guys...I've got the fix! Firstly, just want to thank @spurshot for inspiring me to put this into motion. Ever since I saw the 14+ GMC's, I thought to myself hmm...I wonder if it's possible to make those bright DRL LED's run the same at night. I probably wouldn't have dived into this if it wasn't for Spurshot's How-To on the Fogs w/Highs as I used the same idea with this. So here it is, using the same 1N4004 diodes: BCM X4 (Black Connector) Pin 1 to Pin 7 Pin 2 goes to Pin 7 on BCM X5 (Brown Connector) See pictures below for the schematics. BEFORE & AFTER And yes...I'm putting in HID's this weekend. Just picked up a 2015 Denali CC 6.2L/8spd in exchange for my 2014 High Country and the mods are still in progress! Enjoy
-
Does anyone know where the theater effect for the dome light courtesy light relay is? I need to tap into the power before this effect in the wiring. 2019 Silverado 1500 RST
-
 I recently upgraded my taillights to Denali ones I wired everything even the ballast but I get the left indicator failure message every once in a while . ballast are from Amazon should I get a better one
 -
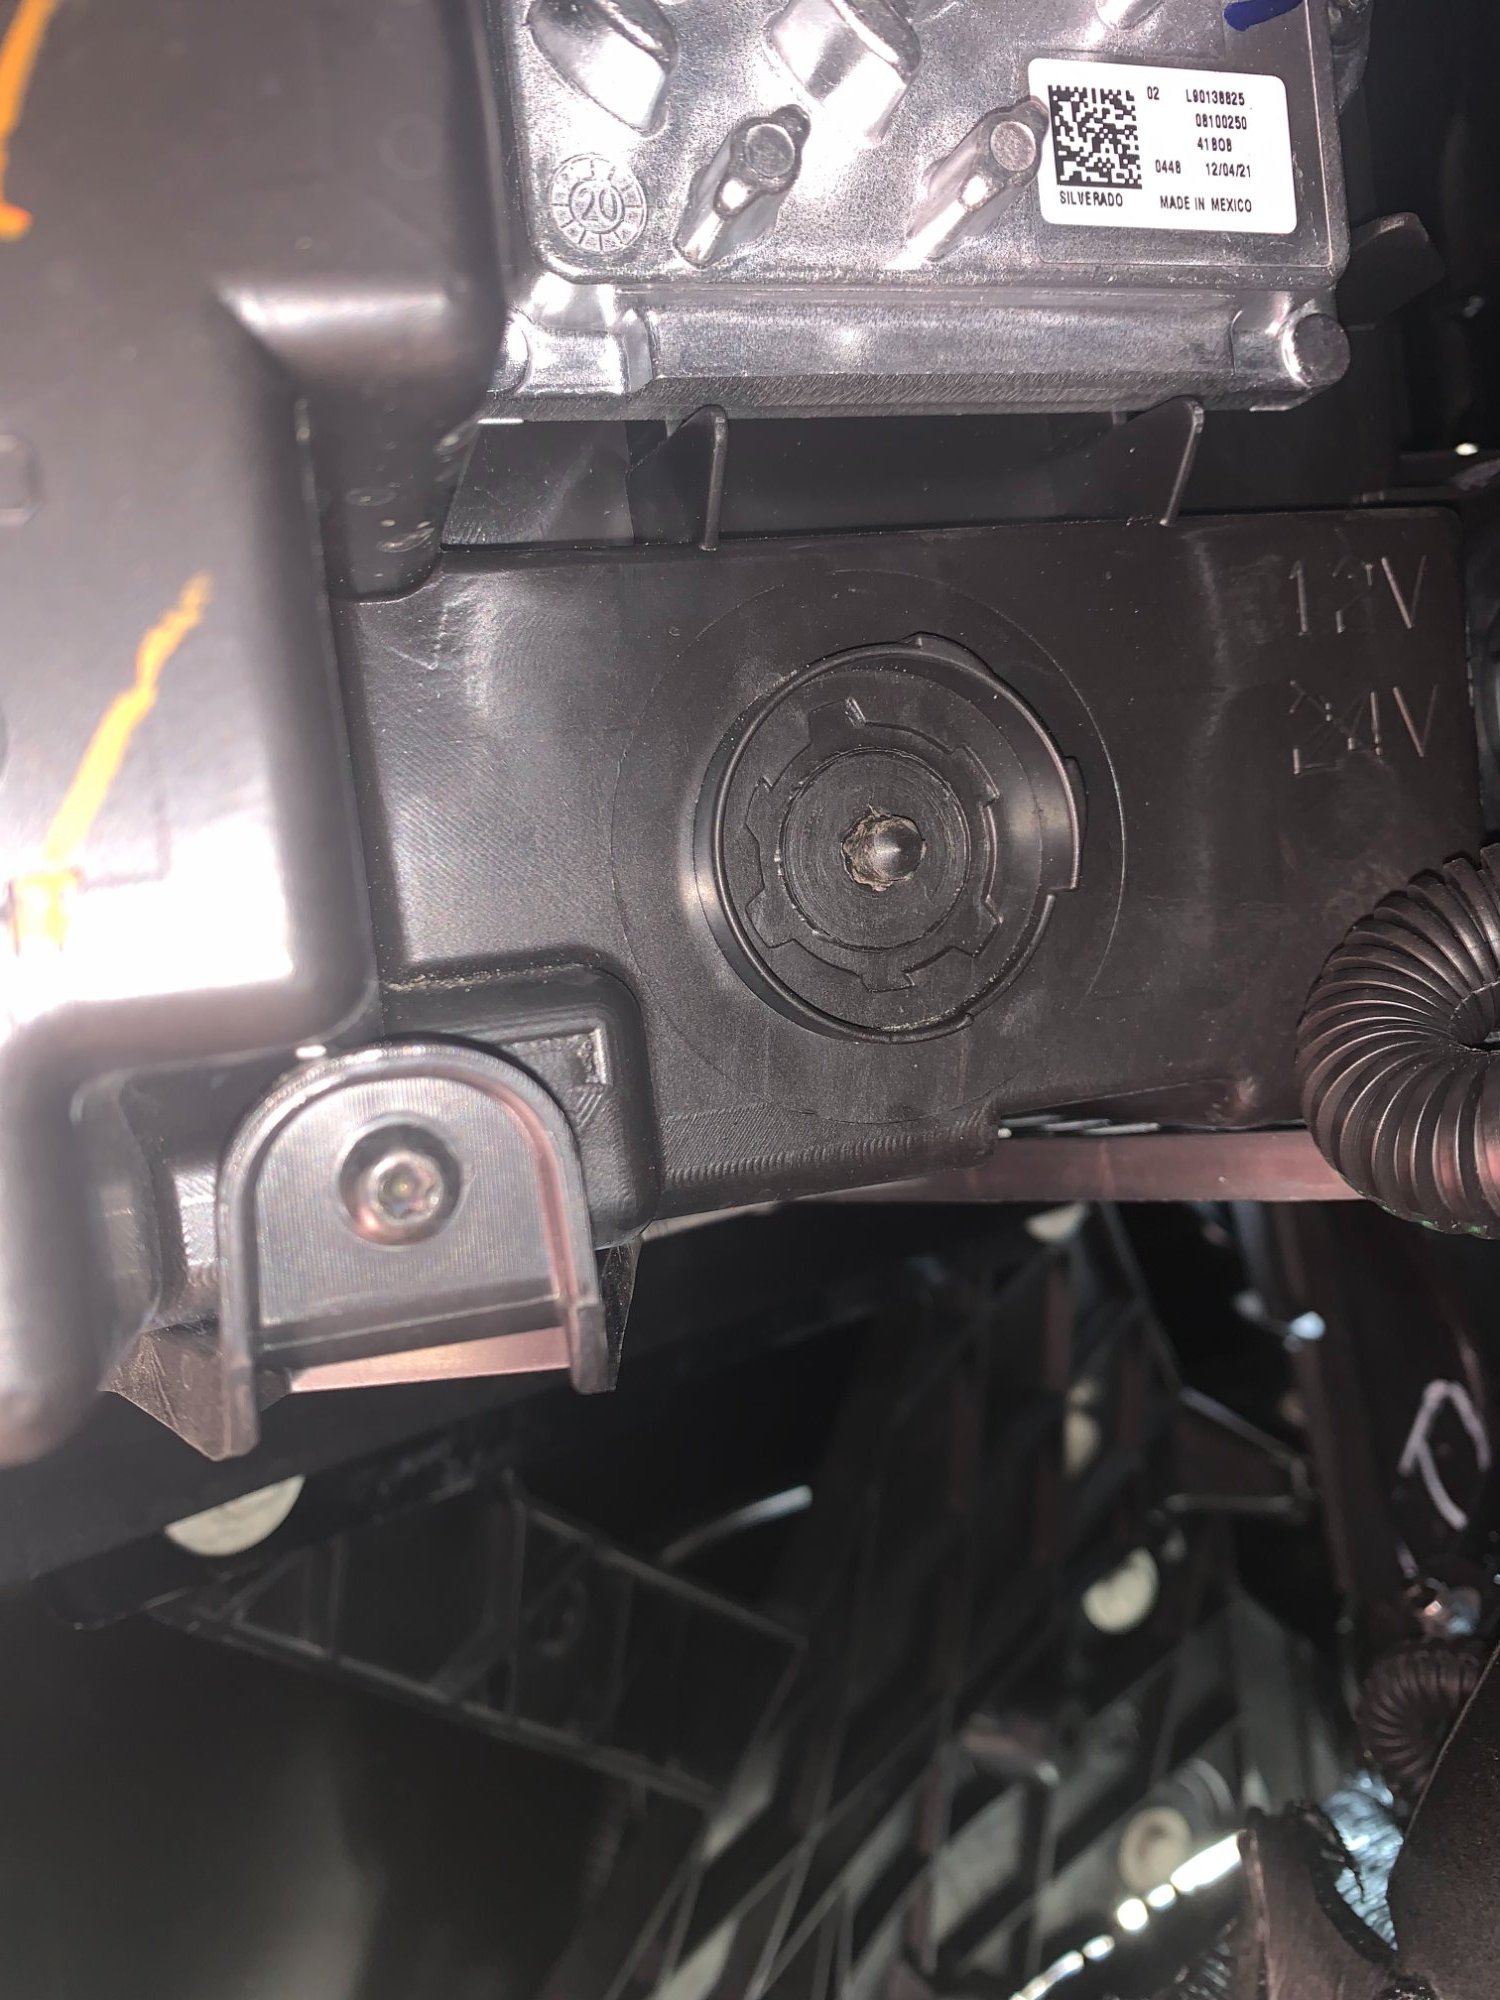
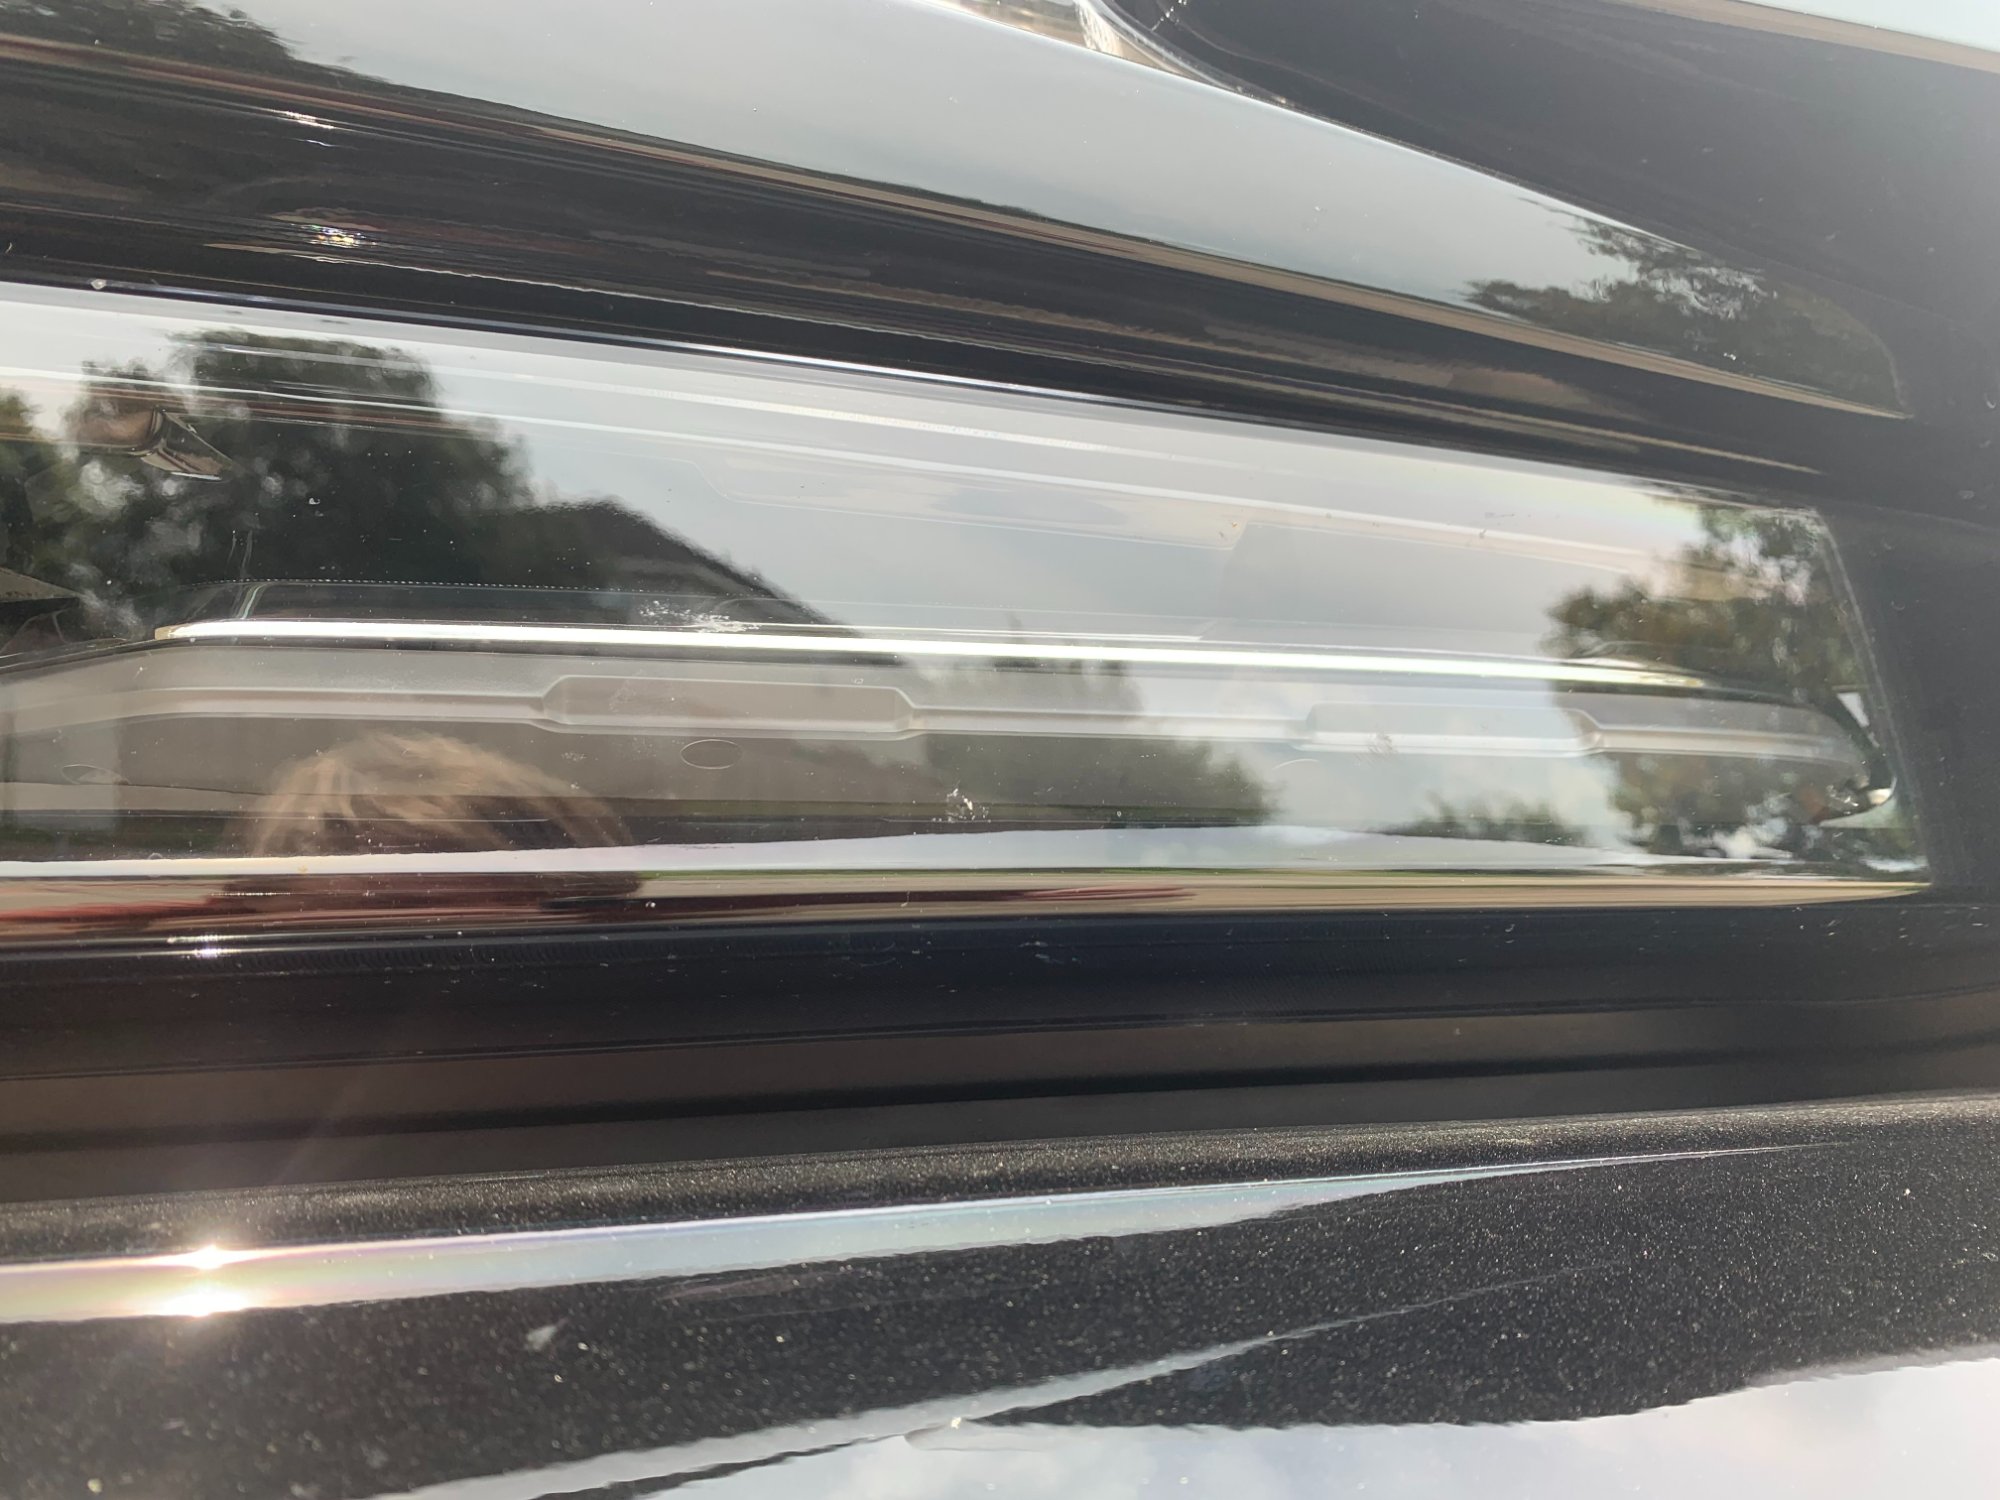
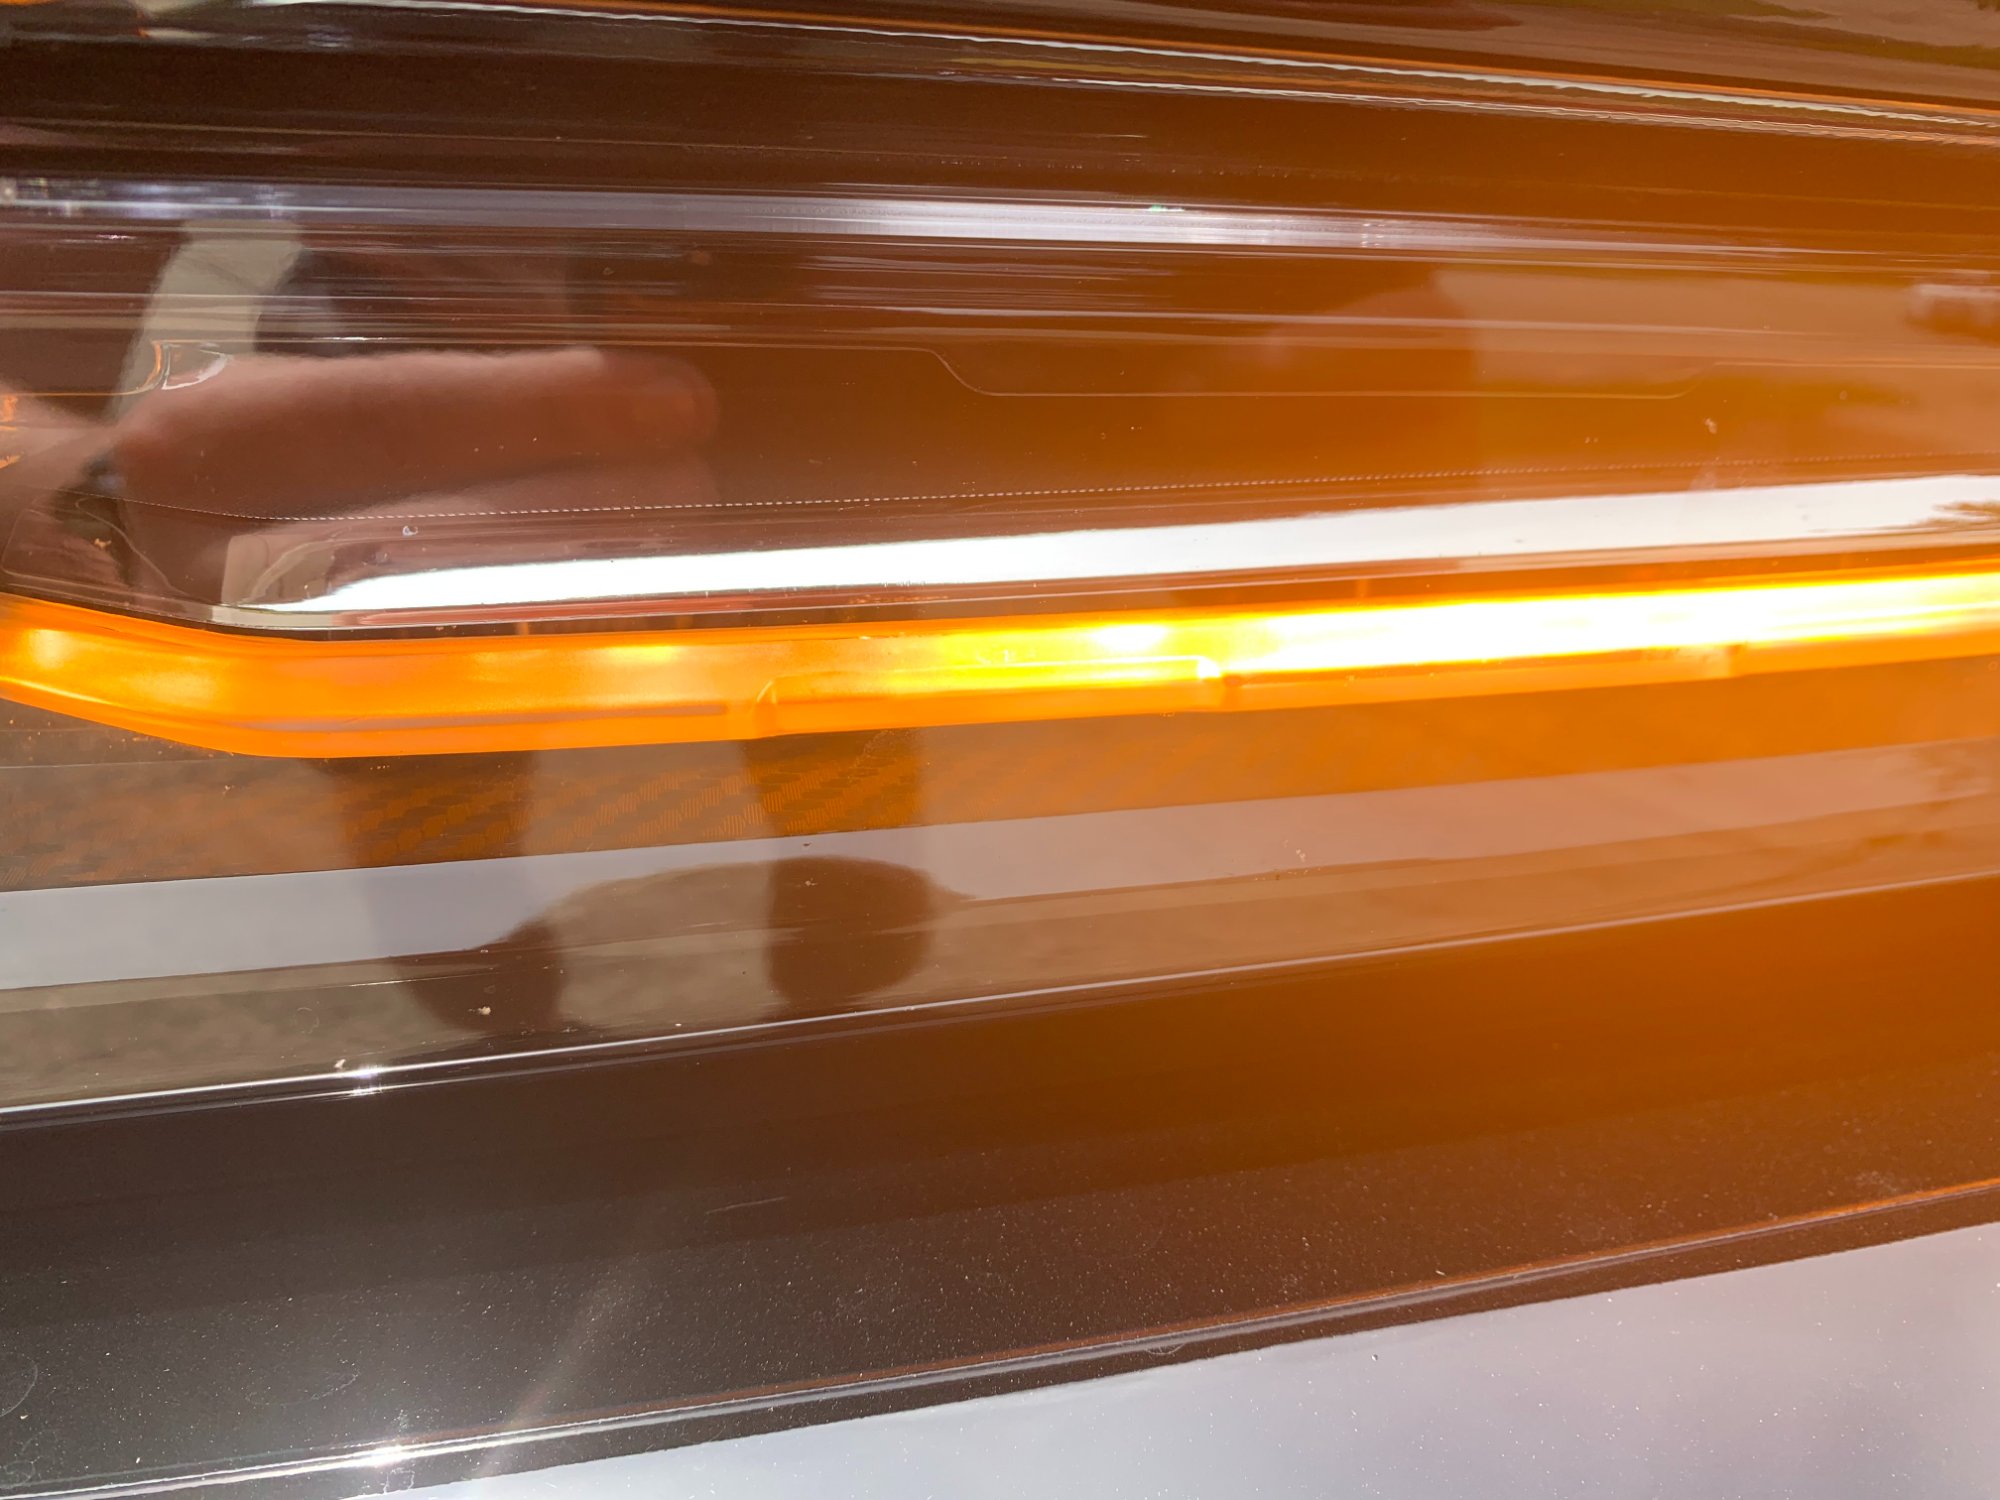
 Hello All, New to this site, just bought a new 2021 Silverado LT Trail Boss a few weeks ago. One of the first things I am doing to this truck is upgrading the few halogen bulbs that GM decided to keep on it. The Rear backup and license plate lights all went super smooth, no issue. But when I went to remove the front blinker bulb from the housing I was faced with a different configuration than what I've seen. The place where you would normally find the circular grip for twisting out the bulb has a small hex head there in place, and it does not look to actually come apart (Please see attached picture). I think that I might have a different blinker than what normally comes with this trim (and I think it may already be LED) but I am unable to find anything online that resembles or mentions this configuration. I am only able to find the typical bulb backing which does not match mine. Does anyone have insight to this or possibly know what kind of blinker I have? I have included a picture of the back of the blinker as well as the light housing itself as I think it too looks slightly different than others I have seen. Thanks in advance!
-
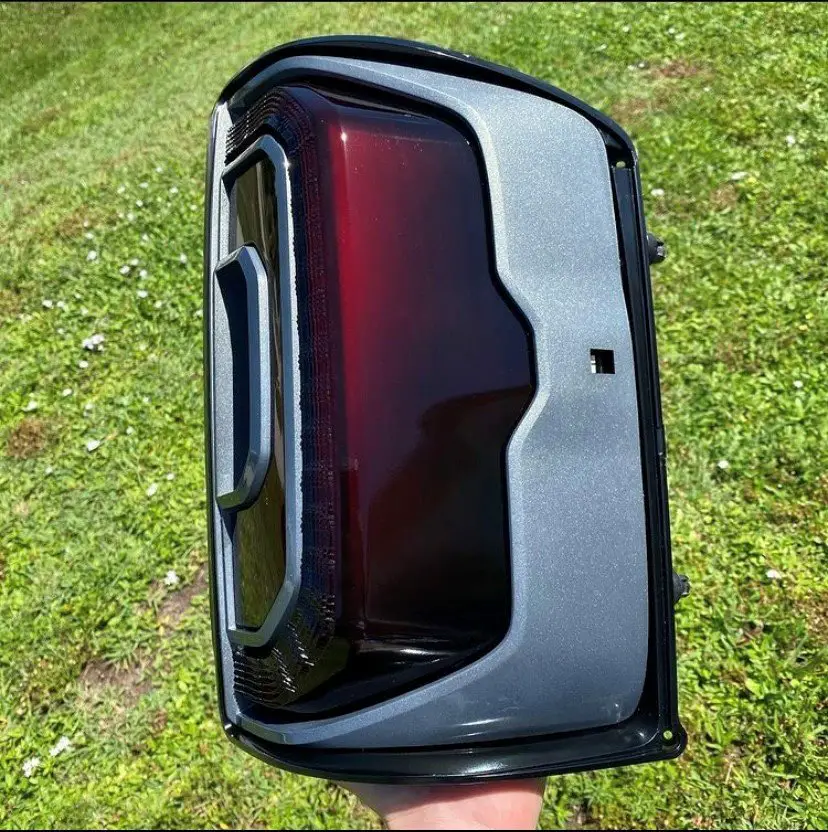
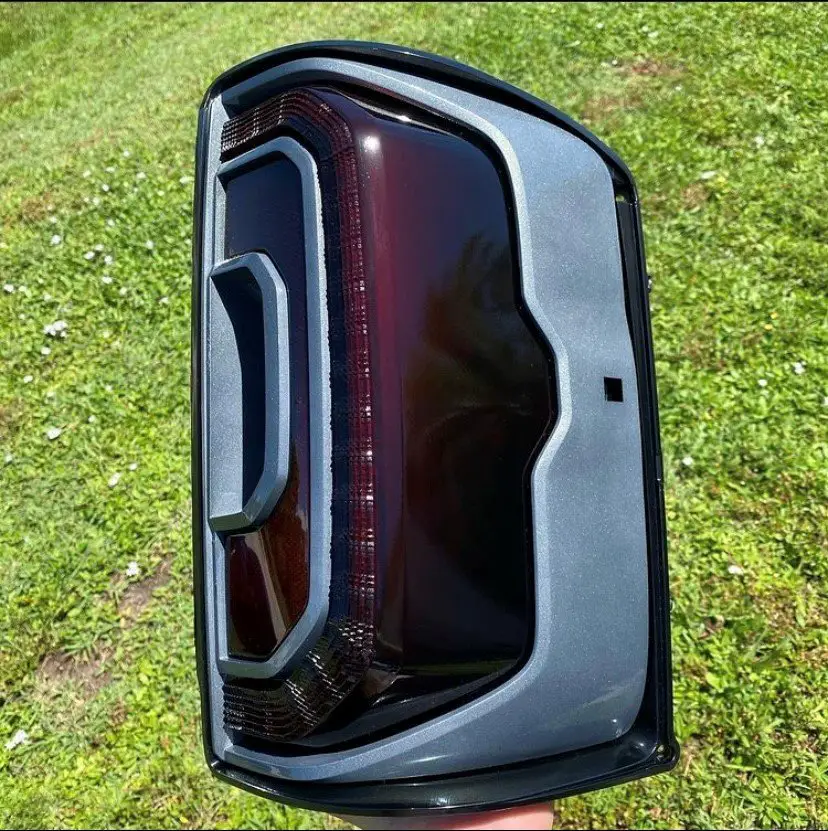
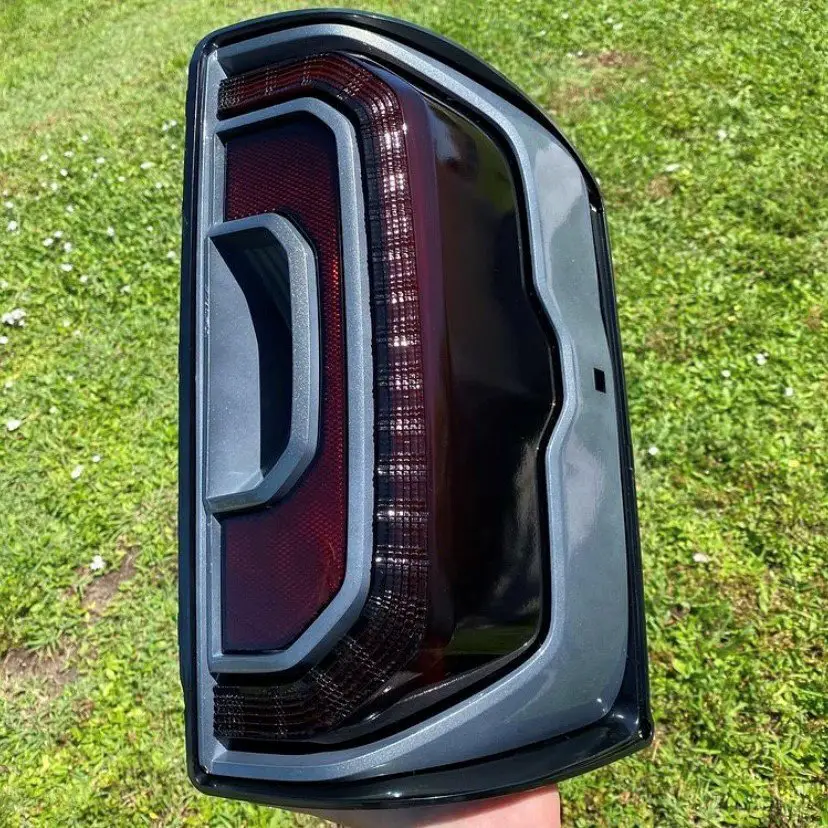
.thumb.jpg.b785d5fe4b22caa0cc48402118991c9b.jpg) For sale are my set of custom painted, OEM Sierra Denali LED Tail Lights. I had these painted to go on my truck and unfortunately they took so long I had to go a different direction before I got them back.. I have since moved up to a 3/4 diesel and am hoping these can find an owner who will appreciate the time, effort, and $$$ that went into creating them! These OEM LED Tail Lights are selling for $300 - $500 a piece online, and the cost to have these custom painted Mineral Metallic to match the Denali paint + the lens smoked (lightly, not enough to dim them when lit!) was $700 - looking to get $1,000 including shipping. Can cut a better deal if wanting to pick up in person in the Houston, TX area. Please reach out for additional pictures, questions, etc. I respond much quicker via text (405) 642-9097 Thanks!
For sale are my set of custom painted, OEM Sierra Denali LED Tail Lights. I had these painted to go on my truck and unfortunately they took so long I had to go a different direction before I got them back.. I have since moved up to a 3/4 diesel and am hoping these can find an owner who will appreciate the time, effort, and $$$ that went into creating them! These OEM LED Tail Lights are selling for $300 - $500 a piece online, and the cost to have these custom painted Mineral Metallic to match the Denali paint + the lens smoked (lightly, not enough to dim them when lit!) was $700 - looking to get $1,000 including shipping. Can cut a better deal if wanting to pick up in person in the Houston, TX area. Please reach out for additional pictures, questions, etc. I respond much quicker via text (405) 642-9097 Thanks!
- 1 reply
-
- 1
-
-
- LED
- tail lights
- (and 11 more)
-
or sale are my set of custom painted, OEM Sierra Denali LED Tail Lights. I had these painted to go on my truck and unfortunately they took so long I had to go a different direction before I got them back.. I have since moved up to a 3/4 diesel and am hoping these can find an owner who will appreciate the time, effort, and $$$ that went into creating them! These OEM LED Tail Lights are selling for $300 - $500 a piece online, and the cost to have these custom painted Mineral Metallic to match the Denali paint + the lens smoked (lightly, not enough to dim them when lit!) was $700 - looking to get $1,000 including shipping. Can cut a better deal if wanting to pick up in person in the Houston, TX area. Please reach out for additional pictures, questions, etc. I respond much quicker via text (405) 642-9097 Thanks!
-
I just saw a Tahoe LT on my way home from work using the LEDs as DRLs at full 100% brightness just like the LTZ models. Yes, I am sure it was a LT model and it looked totally stock even with the entry level honeycomb pattern grille. He was going the opposite way so I couldn't stop him to ask. Someone out there has figured it out! Does anyone have an update for this mod?
-
(Updated to reflect I have purchased BRAND NEW OEM LED Harnesses to accompany these lights) For sale are my Chevrolet LED Tail Lights. I originally purchased these to replace my existing tail lights but had a change of heart and painted my existing housings instead. In great shape and will be cleaned and polished for new owner. Asking $440 ($470 shipped) If you have any questions or want additional pictures, shoot me a message,
-
 I bought a 2015 2500HD Sierra with regular tow mirrors, recently upgraded to the tow mirrors with the amber front lights. After install, the amber lights only turn on after unlocking the doors and then naturally they time out. Will not turn on as running lights. Any suggestions?
 -
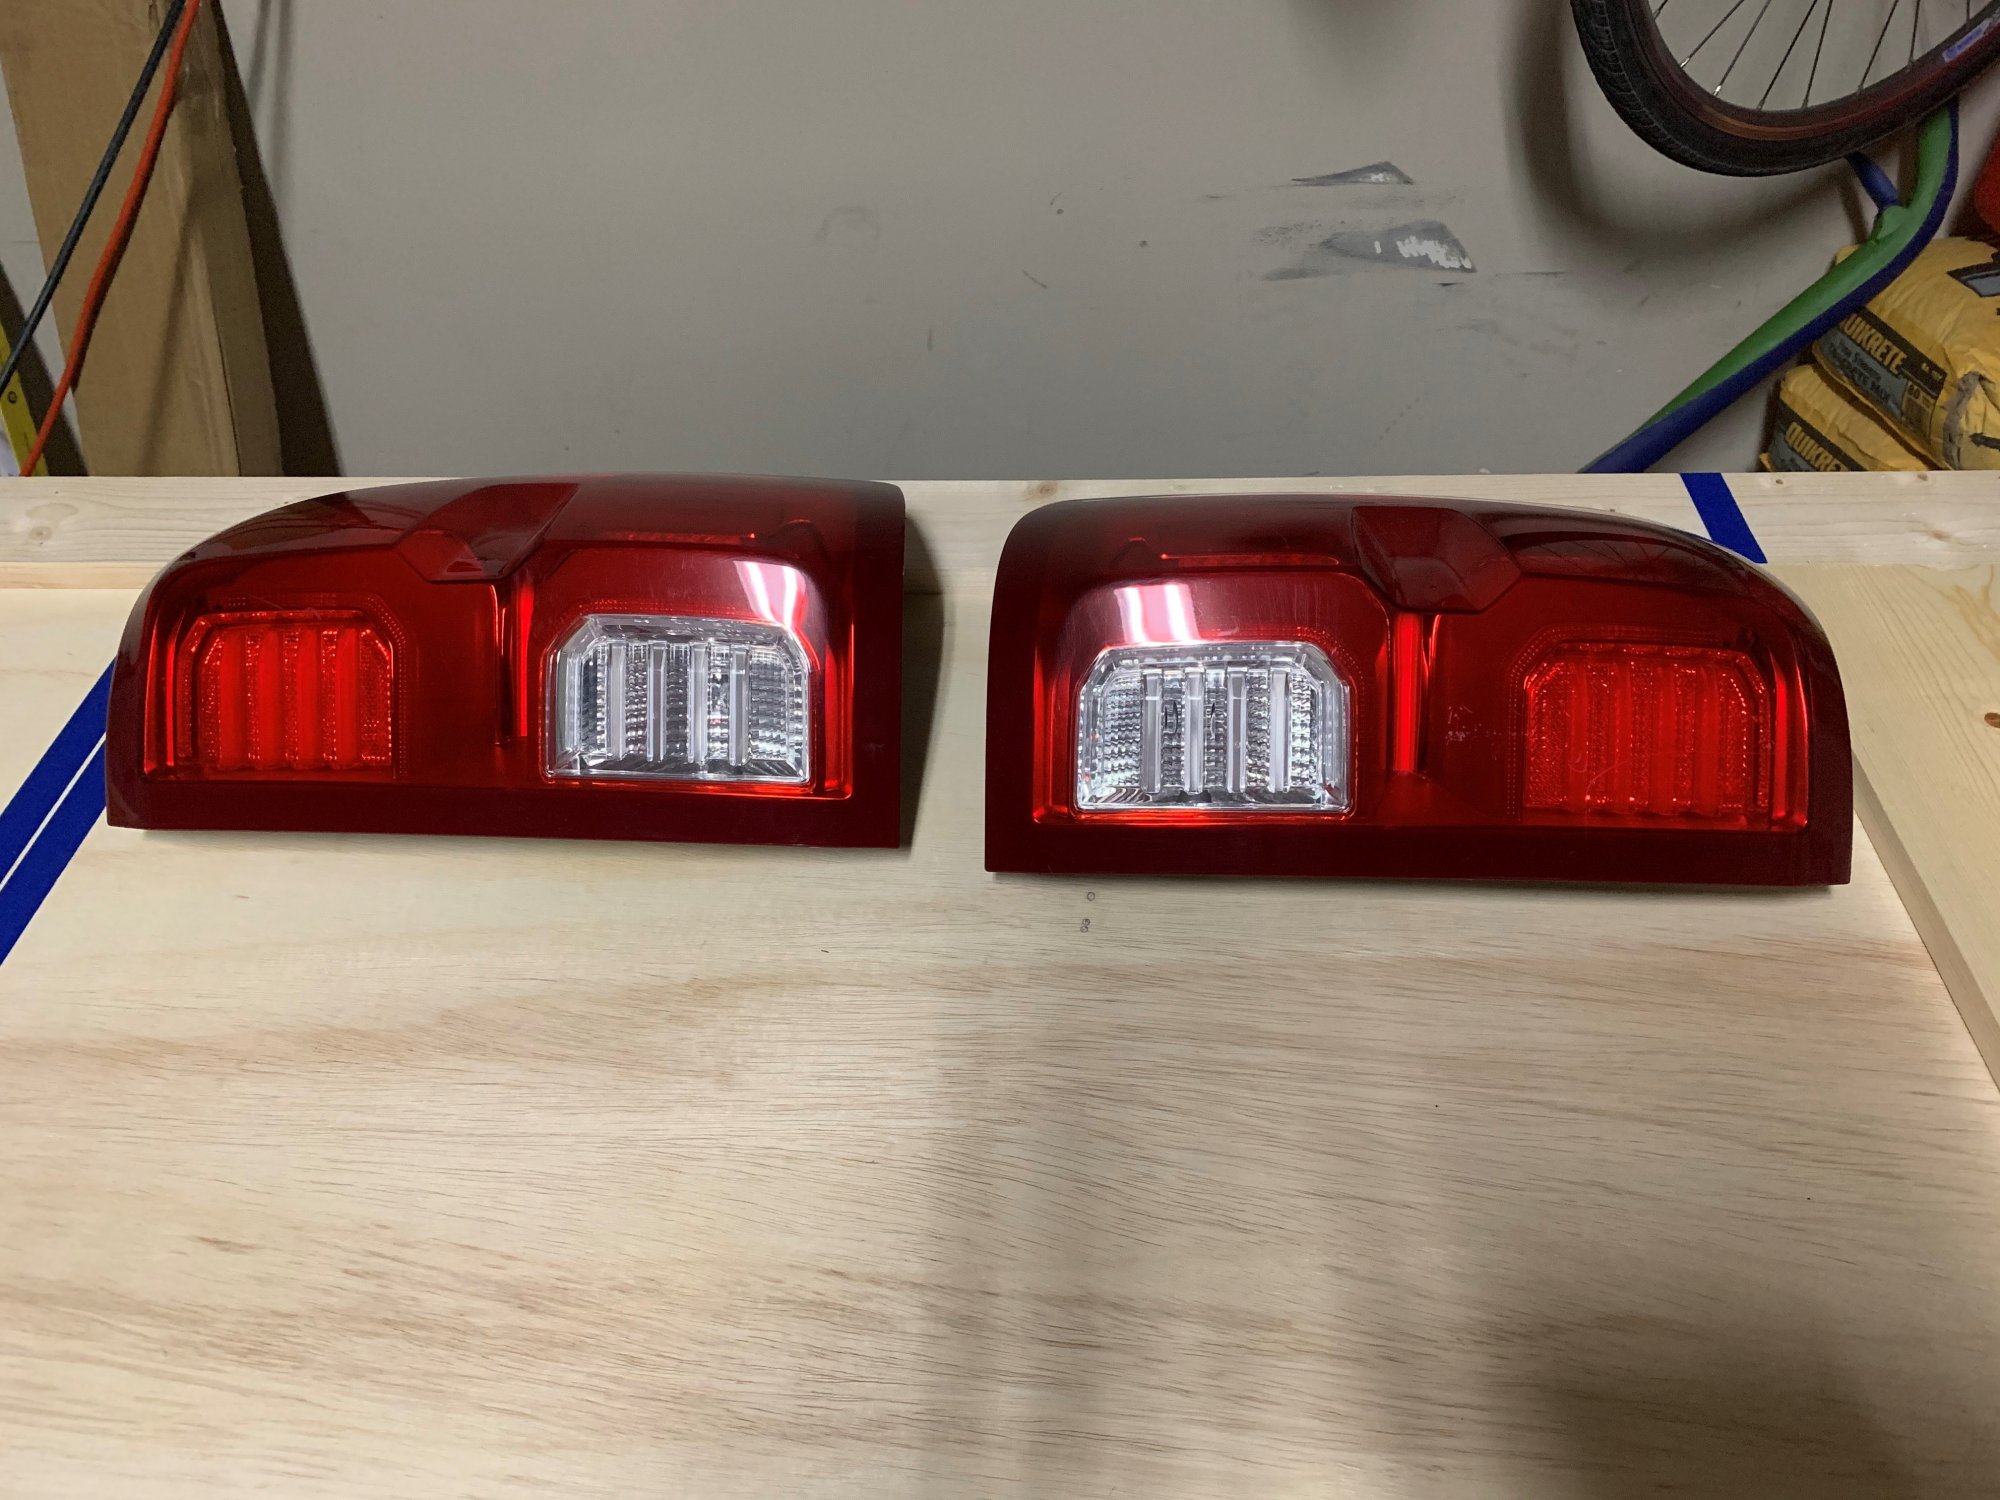
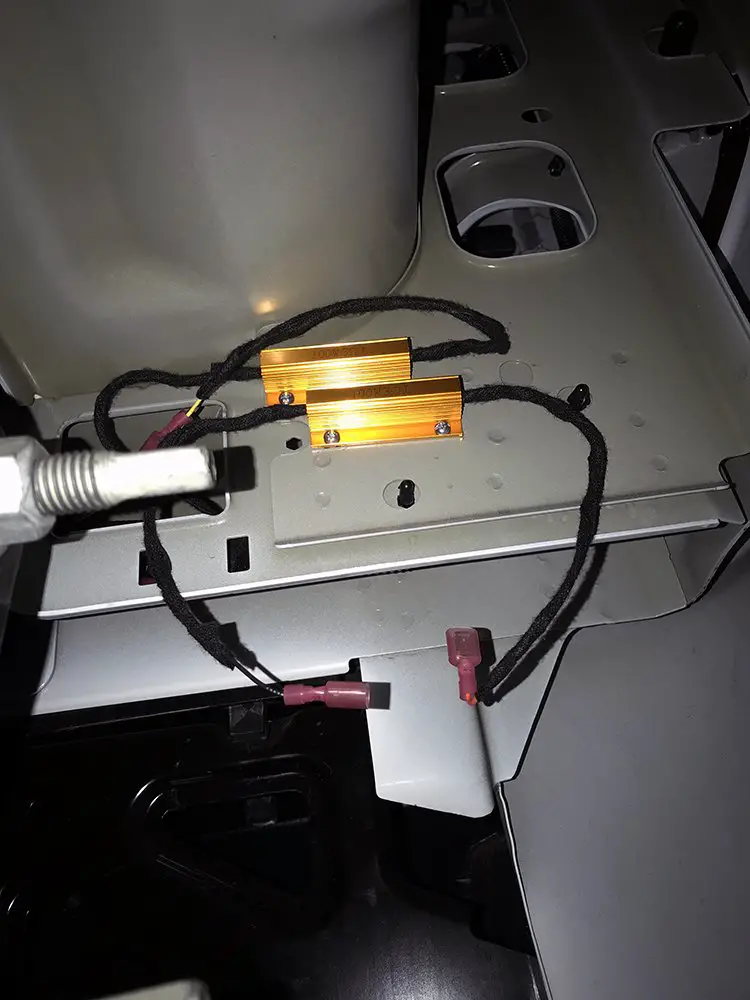
This last weekend I went ahead with putting in the OEM LED tail lights from the LTZ model on my new 2018 Silverado LT. Overall the installation was successfull and fairly easy to do. The tail lights that I have had the stock GM harnesses still attached and I ordered a tail light harness (with resistors for hyperflash) from PGamboa. BTW if you are planning on doing this mod I would HIGHLY suggest the kit from @pgamboa. The kit was shipped quickly, was made with quality and I have never met a person that was willing to answer so many stupid questions from me . I would say that the most difficult parts of the entire process was picking a good place to mount the resistors, and doing the actual routing of the stock wire harness. The cables from the tails are actually threaded down behind the lights and down to almost the middle of the truck near the spare tire to an electrical hook up. If I could give anyone advice on this it would be to drop the spare and move it out ahead of time, makes clipping the cables in way easier. So onto the picks: Before the project: Where I decided to mount the resistors. This is on the drivers side and it is close to where the other cables run down. The cables were eventually routed in that opening to the left and continued through the stock channels: Close up off the resistor location: Afterwards, lit up at night: and with the reverse lights on: I know that some people say that they are too expensive, however I just think that they look better than most of the aftermarket tail lights that are out there. Also yes I am planning on adding White LED Reverse lights and LED License plate bulbs. If you have any questions about the process I would be happy to try and answer them.
- 41 replies
-
- 2
-
-
- tail light
- tail lights
- (and 1 more)
-
I have a 03 Sierra and installed a LED light bar with dedicated harness from the battery to a switch inside the Cab. So my light bar ran perfect and then I started noticing when I turned them off, they would still flicker. So I bought a Load Equalizer and installed that in line close to the light bar and screw it to the frame. I go to turn my lights on and now they flicker while ON but turn off fine. This might be stupid simple but could that mean the Equalizer is bad? My connections are pretty solid.
-
 I saw a few topics on swapping the Silverado 2020 LT 2500HD but they seem older posts from 2019. We just bought our 2020 and love it but I want to change the lights to LED everywhere. I went on Amazon to see but there are so many choices that I don't know where to start. Who else has done this ? help please :)
-
I was wondering if any of you have replaced the cargo and backup bulbs to LED. I have always used Diode Dynamics bulbs in the past because they are great, however I don't want to spend $170 on backup and cargo LED bulbs. I have Diode Dynamic license plate bulbs already because they weren't too high on the price. So if any of you guys replaced them and found bright white LED bulbs that aren't $170 like Diode Dynamics I want to know what brand you went with and where you bought them. Thanks!
-
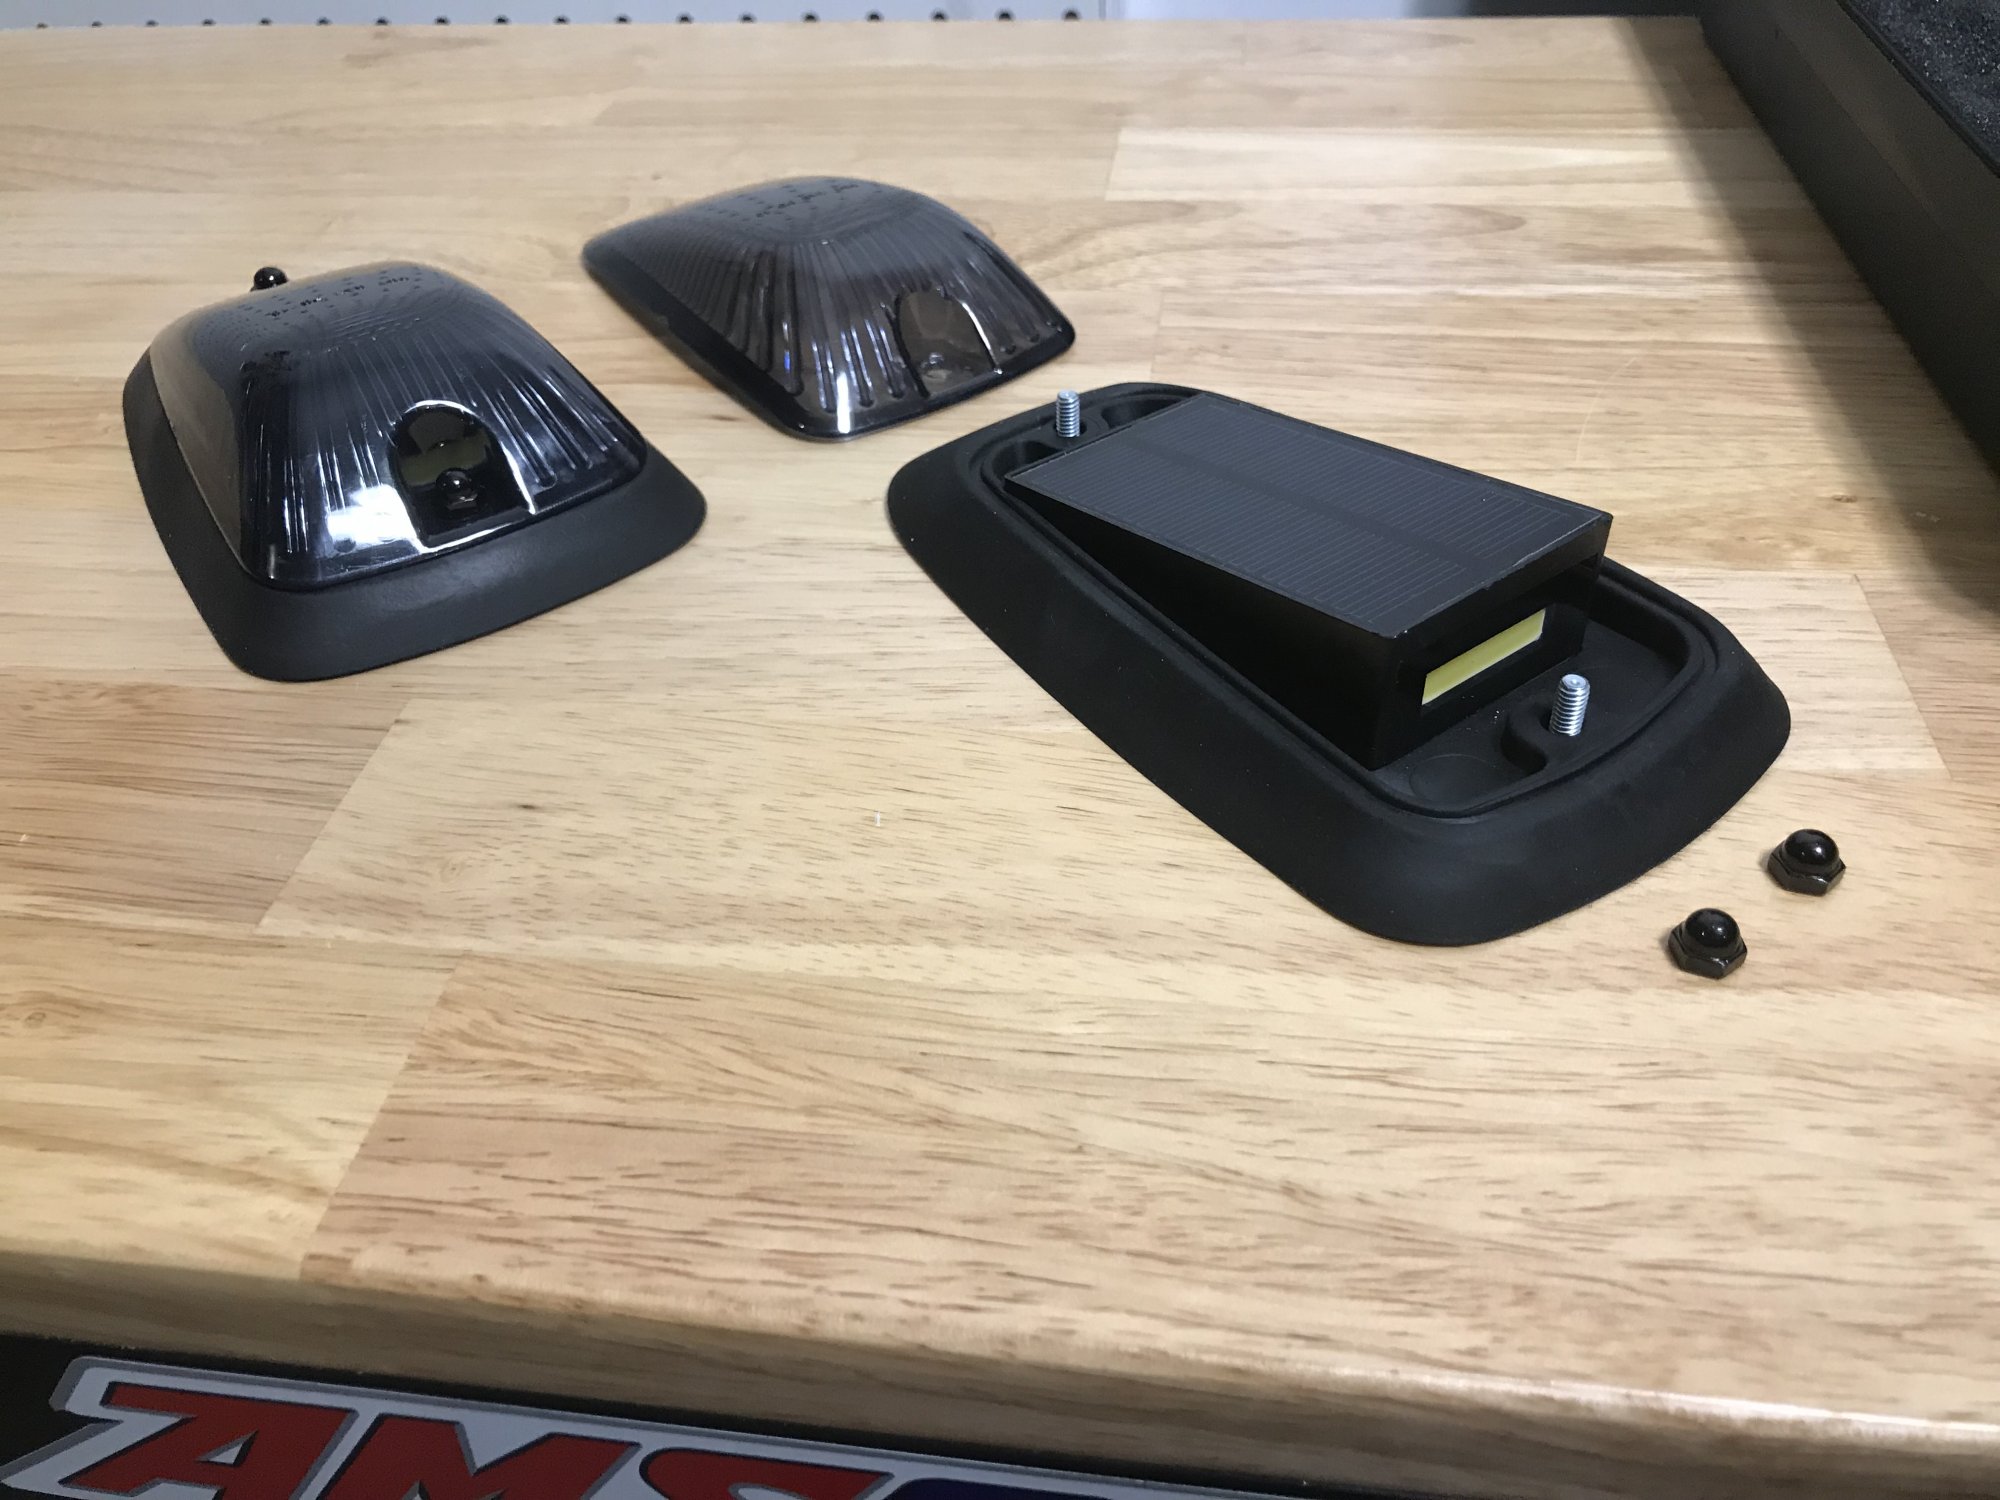
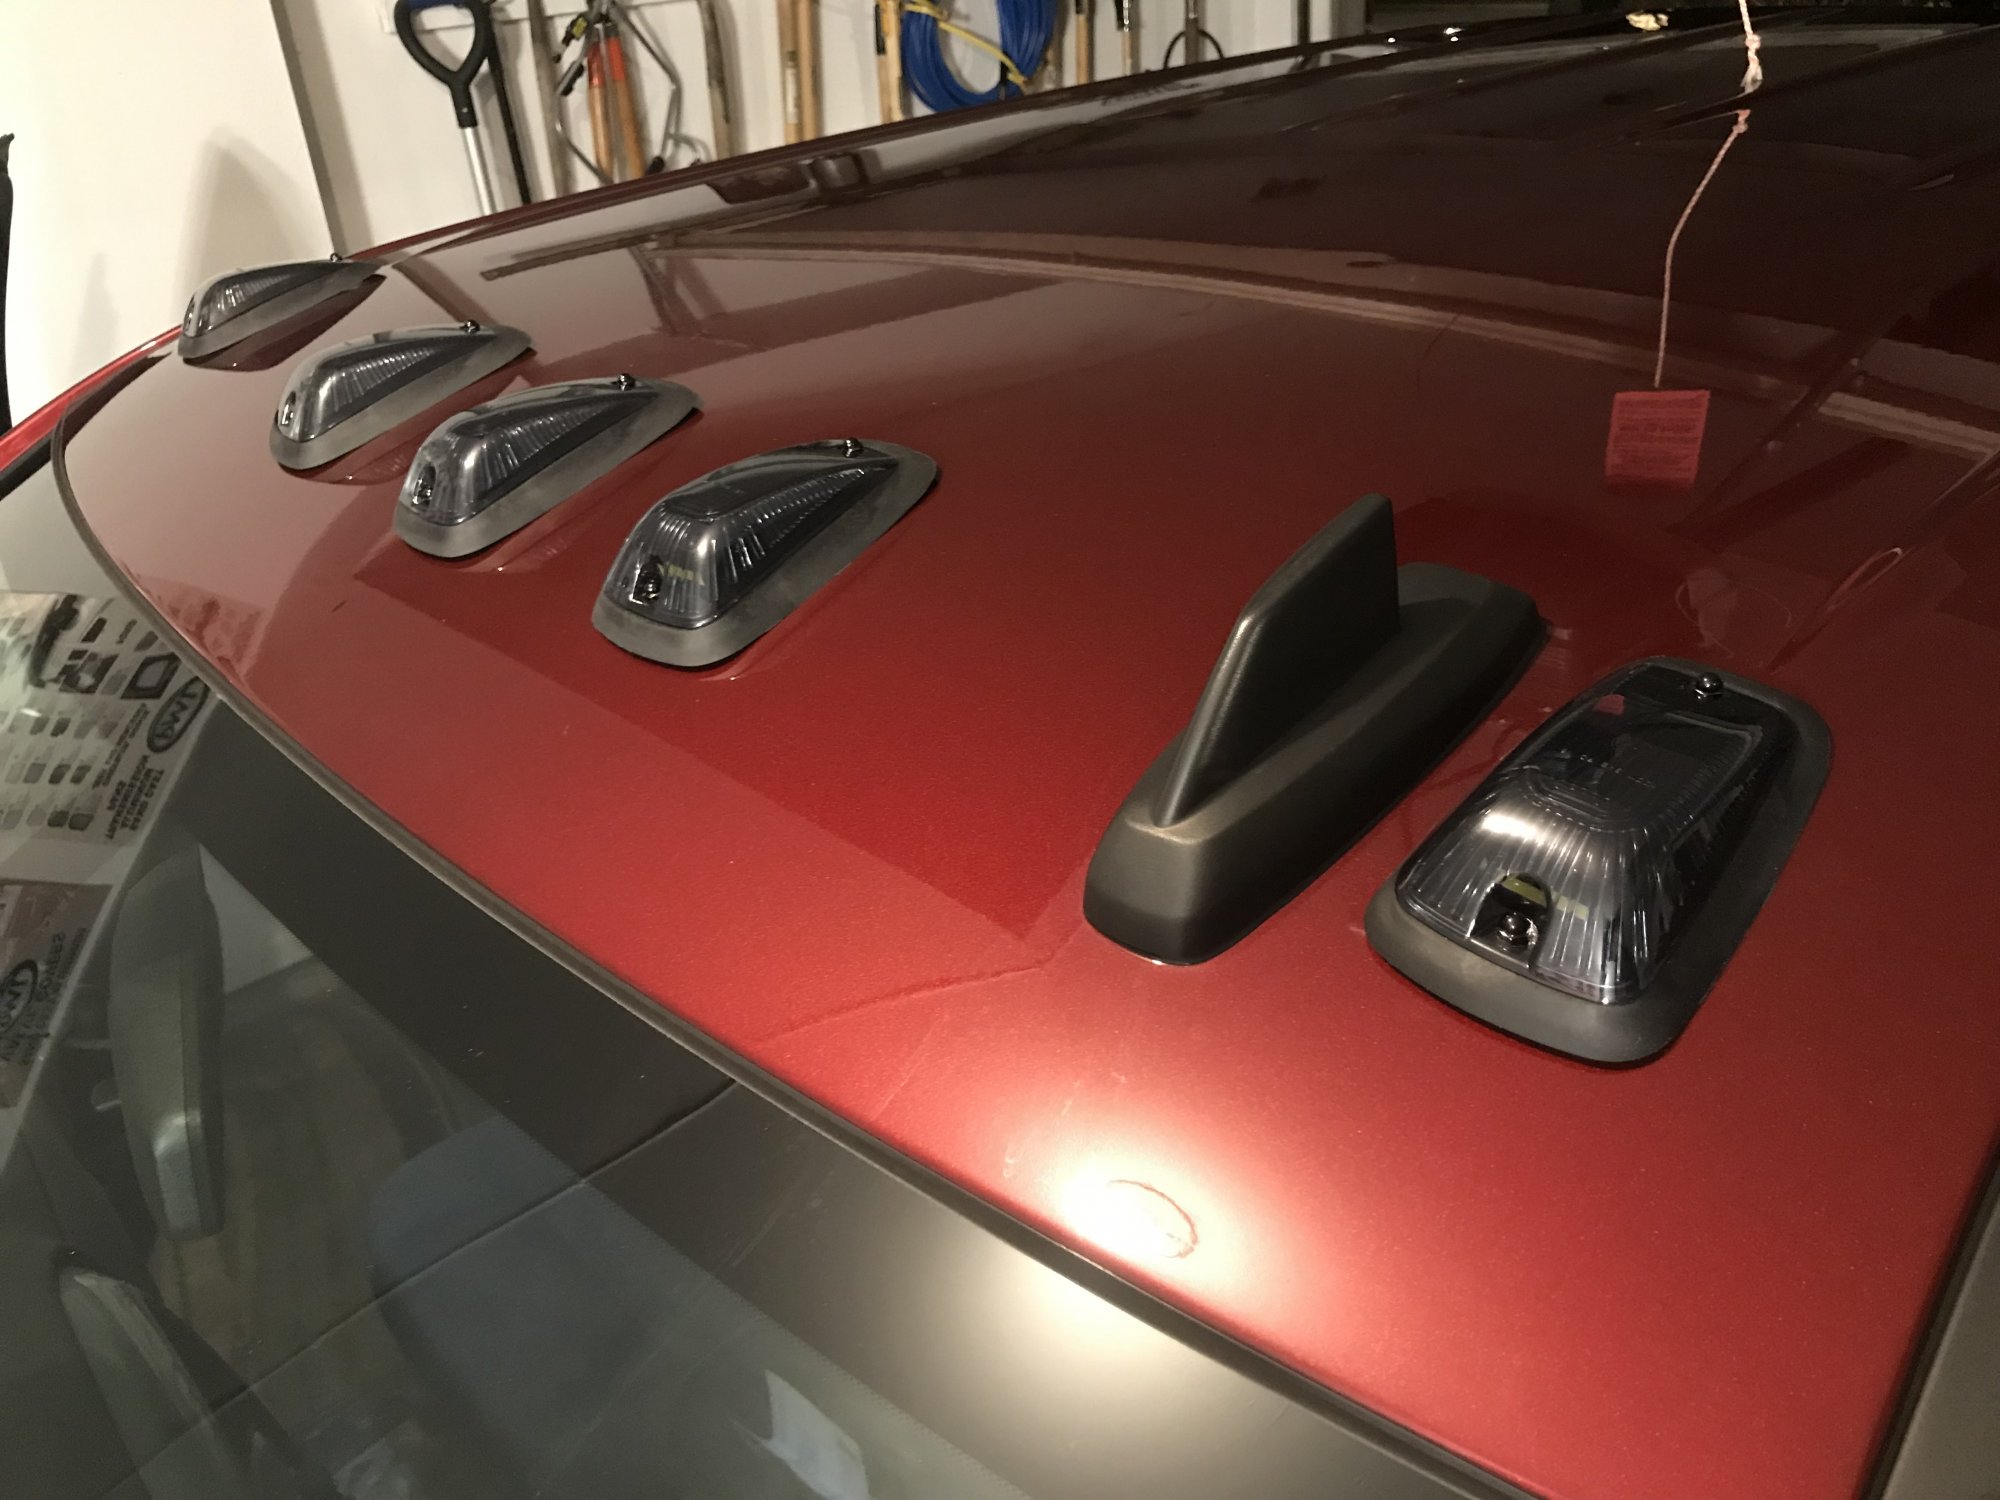
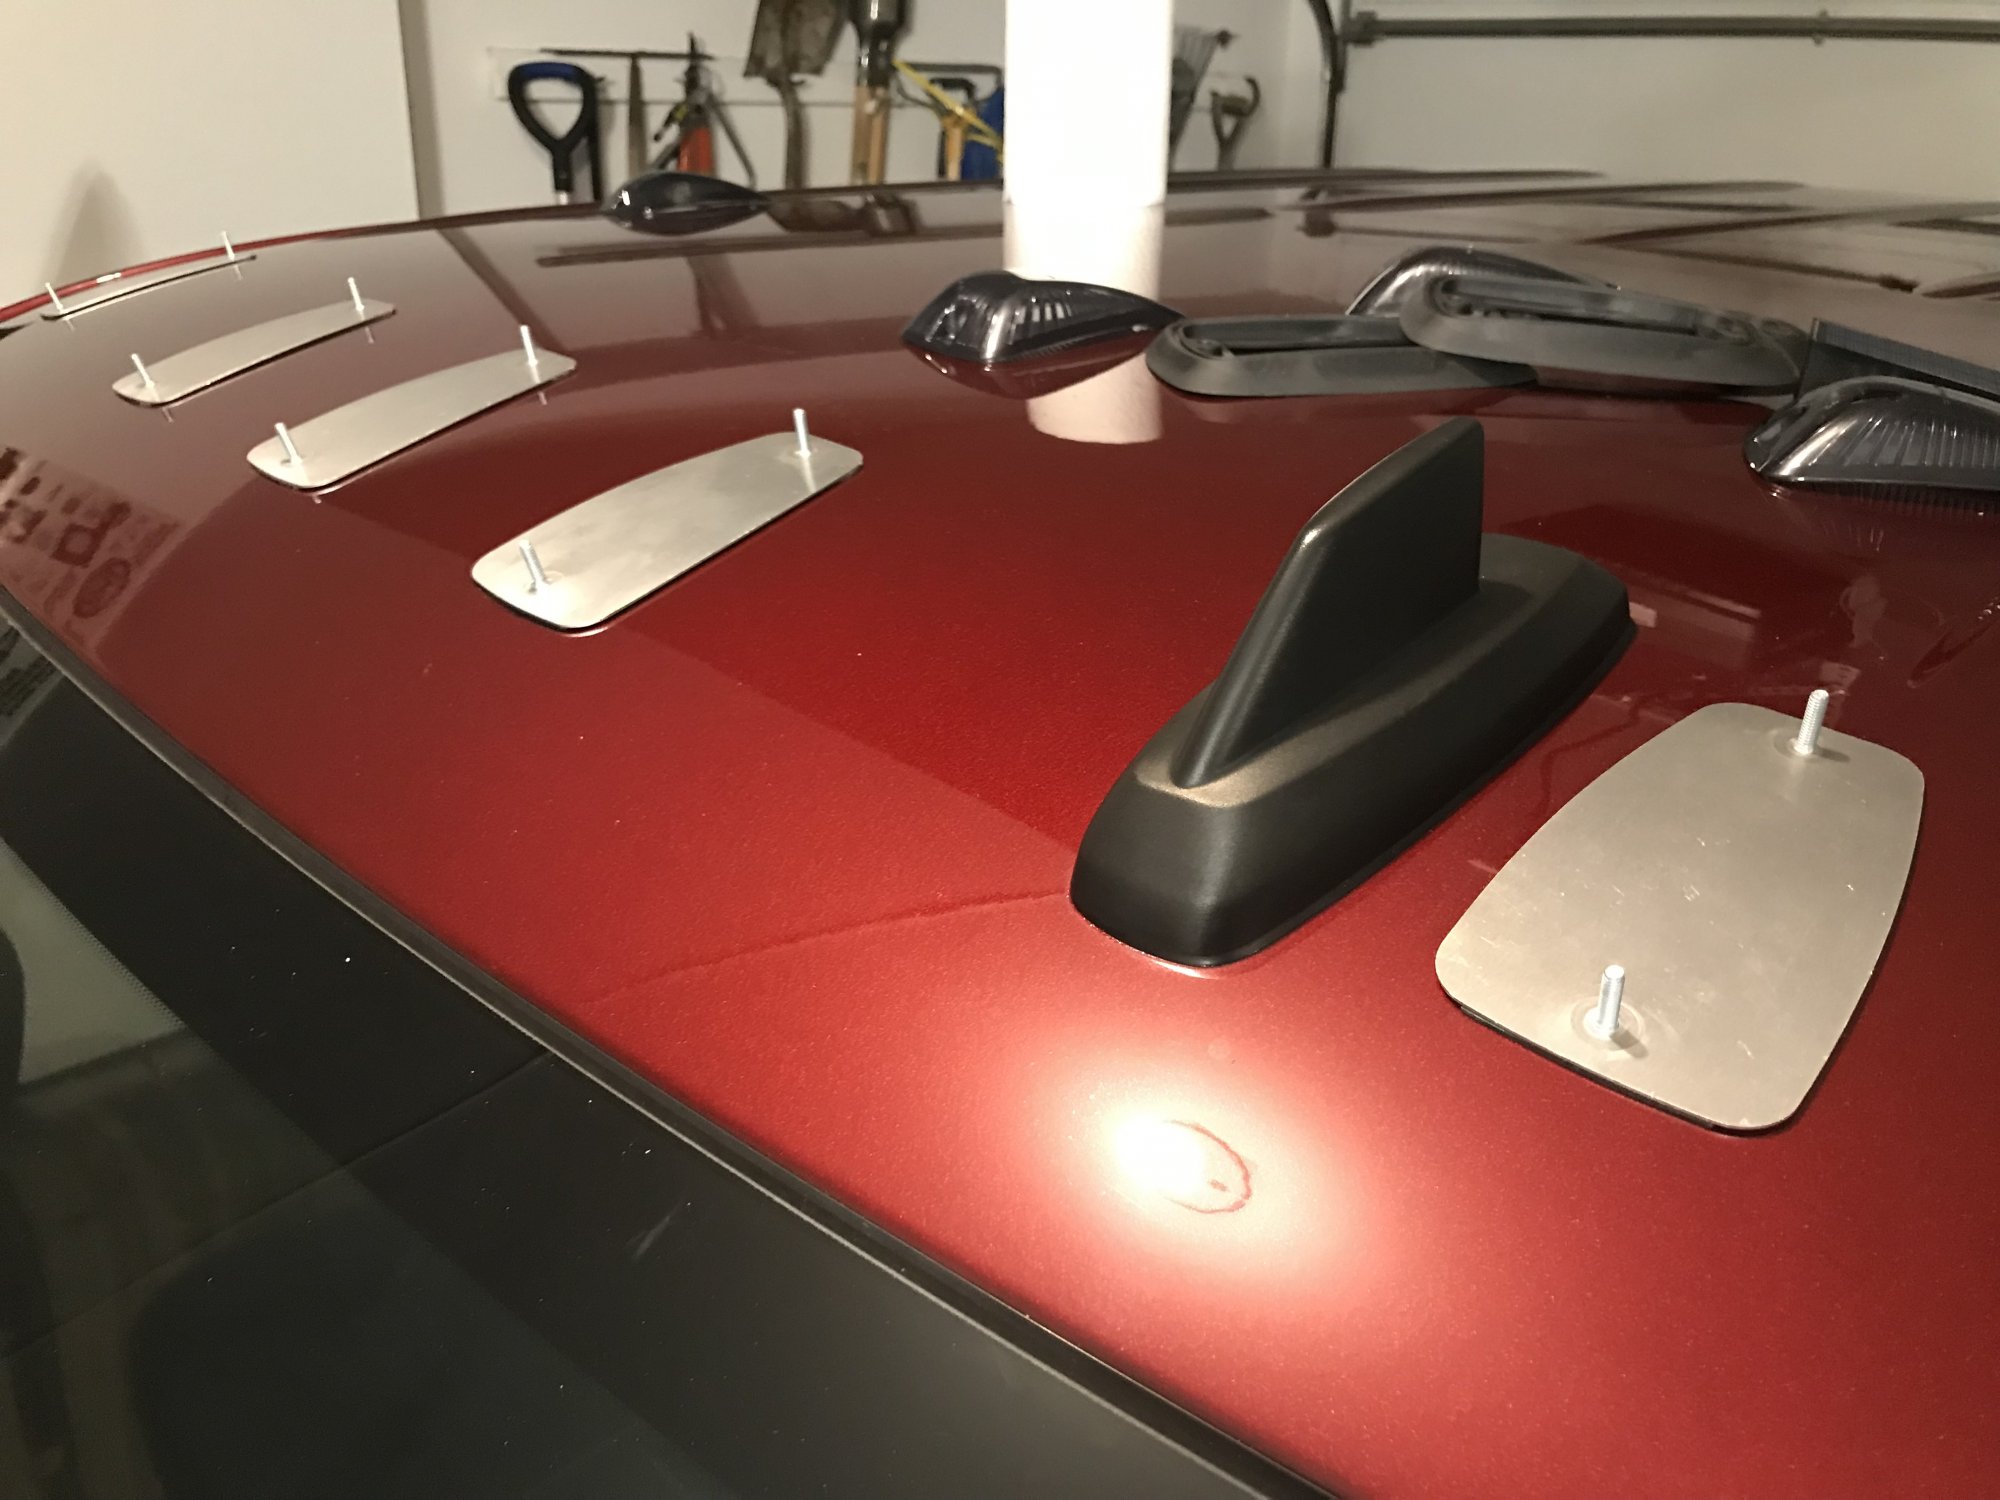
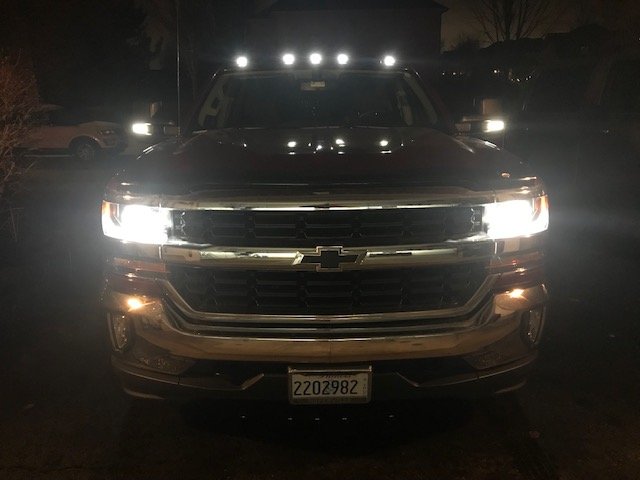
Quick how to and review of the Cab Over America wireless cab lights. Link to parts: https://caboveramerica.com/ The parts: For just under $400 you get a set of 5 battery powered wireless cab lights. Each light consists of 4 parts; the aluminum mounting plate, rubber gasket, LED/PV panel module, and the top lens. The top lenses can be had in clear, amber or smoke. In our case, we went with smoke. You also get two remotes to control the lights. Overall the quality is high and what I would expect from something in this price range. You also get some small lenses that can be place inside the cab lights to change the lights to amber while still using a clear or smoke outer lens. Lastly you are given a Cab Over America tape measure. We laid the tape out but ended up using a tape measure for all measurements. The install: First step was to decide on how you will be playing out the lights. We went with the two edge lights and 3 concentrated in the middle. Others may go with the even spacing all the way across, completely up to you. Here's a test fit. Also shows you the clearance with the shark fin. Remove the two nuts, lens, LED, and gasket so you are just left with the aluminum bracket with screw posts. It was easier to measure and mount the brackets without all the extra parts. We also bent the brackets a bit to fit the counter of the roof in the location they'd be installed. Here they are laid out in position. Wipe down the front 10" of your cab with Isopropyl alcohol. This is to prep the surface for better adhesion. Starting with the cab light nearest to the shark fin, measure 4.5" up from the windshield and 4.5" from the rain gutter to the front stud. This will locate the front mounting post. The rear post of the drivers side cab light should also be 4.5" from the gutter. Using a marker to make temp markings so when you remove the tape backing you can guide the bracket into position. Remove the tape backing, heat up the double stick tape, and install using your guidelines. Repeat for the passenger side light. Find the center of the windshield, measure 4.5" straight back, this will locate the front stud of the center light. Make sure the mounting bracket is straight and mark guide lined with a marker, remove tape backing, heat up the tape, then install. For the side center lights, we offset the lights 7.5" from the center light centerline. Measuring 7.5" from the center light's stud to the side light studs we were able to locate the side lights. Both the front and back studs of the side cab lights are 7.5" from the respective studs on the center light bracket. After all the metal brackets were installed the rubber gaskets were reinstalled, LED modules installed, and the lenses were screwed down. Last step was to sit back and enjoy the lights. They look great with the switchback mirrors! Here is a video of the install if you don't like reading! Thanks! WF41
-
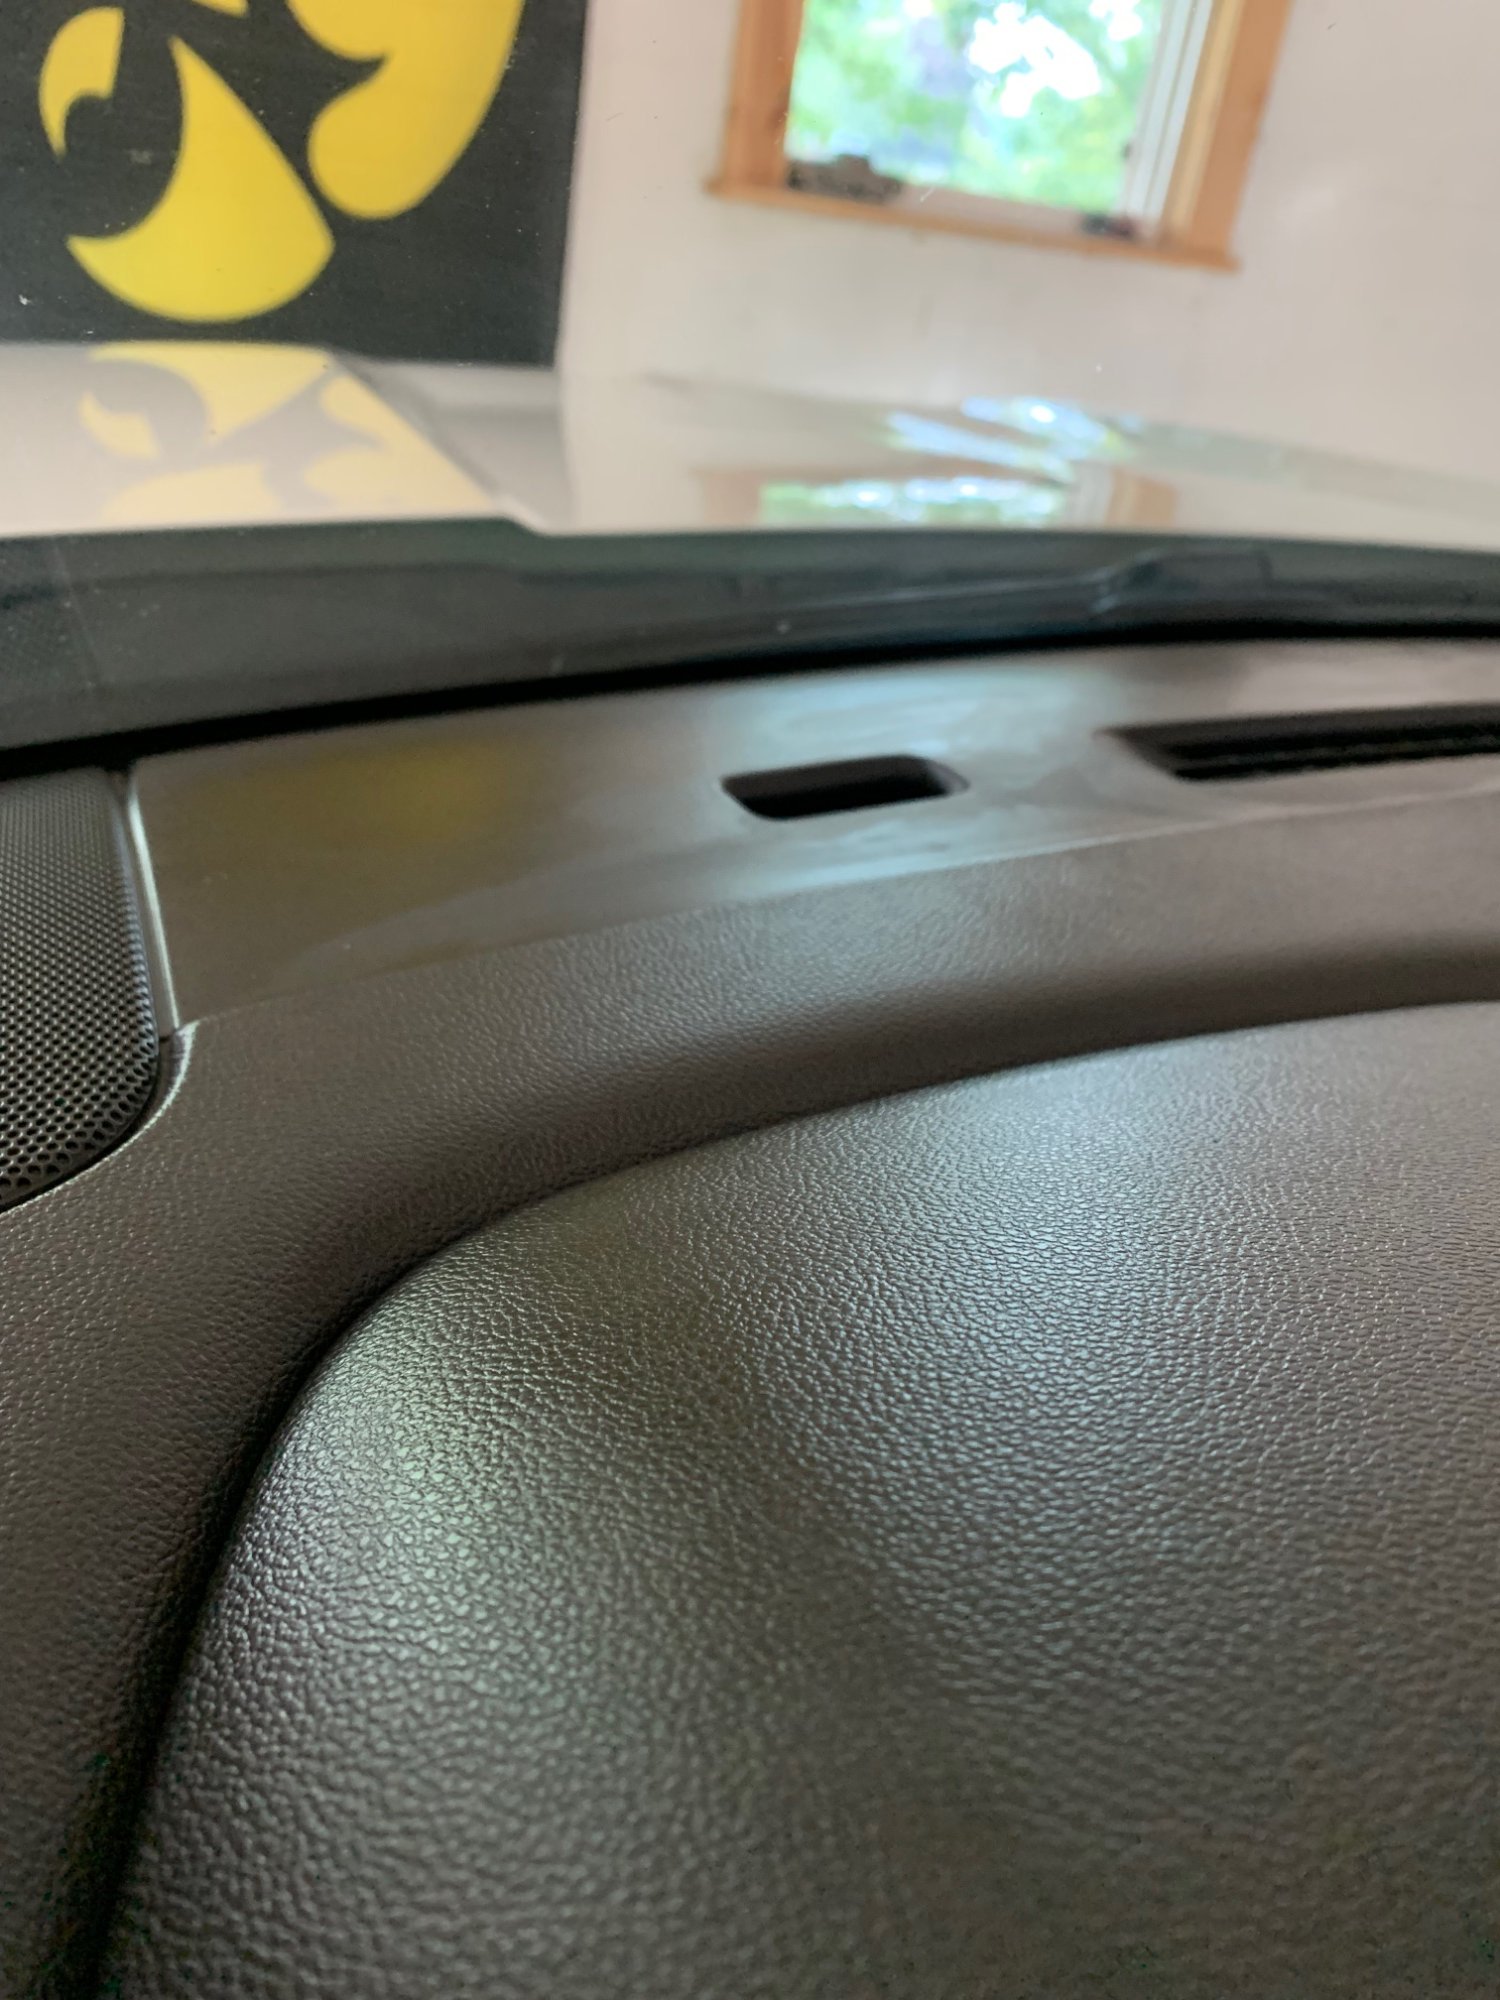
I just noticed this while cleaning the dash. It looks like some LED strip of some sort in there. Went through settings and didn’t notice anything about a light for forward collision or anything. Definitely too small to be HUD.
-
 I have a 2017 1500 Silverado. I recently had a message that my right rear turn indicator had failed. I checked and yep, the bulb was broken. I replaced both right and both left with LED bulbs and now my truck tells me that both left and right turn indicators have failed. All the lights turn on so I don't know what the problem is. Are the LED bulbs not compatible? Thanks!
 -
 I don’t like putting LED bulbs in the OEM housing if they are used on the road since they scatter the bright light and blind oncoming traffic. This install was not hard but more difficult than the 2014-2018 (and 2019 HD) Sierra. 1) unbolt 2 wheel liner bolts (10mm) and remove push tab to make room to work 2) use small ratchet and swivel to unbolt 4 screws (8mm) of the fog light housing and remove wire harness push tabs and remove bulb from fog light 3) use 10mm socket to “cap” the OEM expanding nuts and swap over the adjuster and only the ends of the 2 other retaining nuts 4) trim off all 3 tabs of the Morimoto pigtail with razor knife or box cutter (wear cut gloves and cut away from your hand and body) as you will install the plug upside down or the lights will not turn on 5) put it all back in and adjust light associated pictures will be loaded below.
-
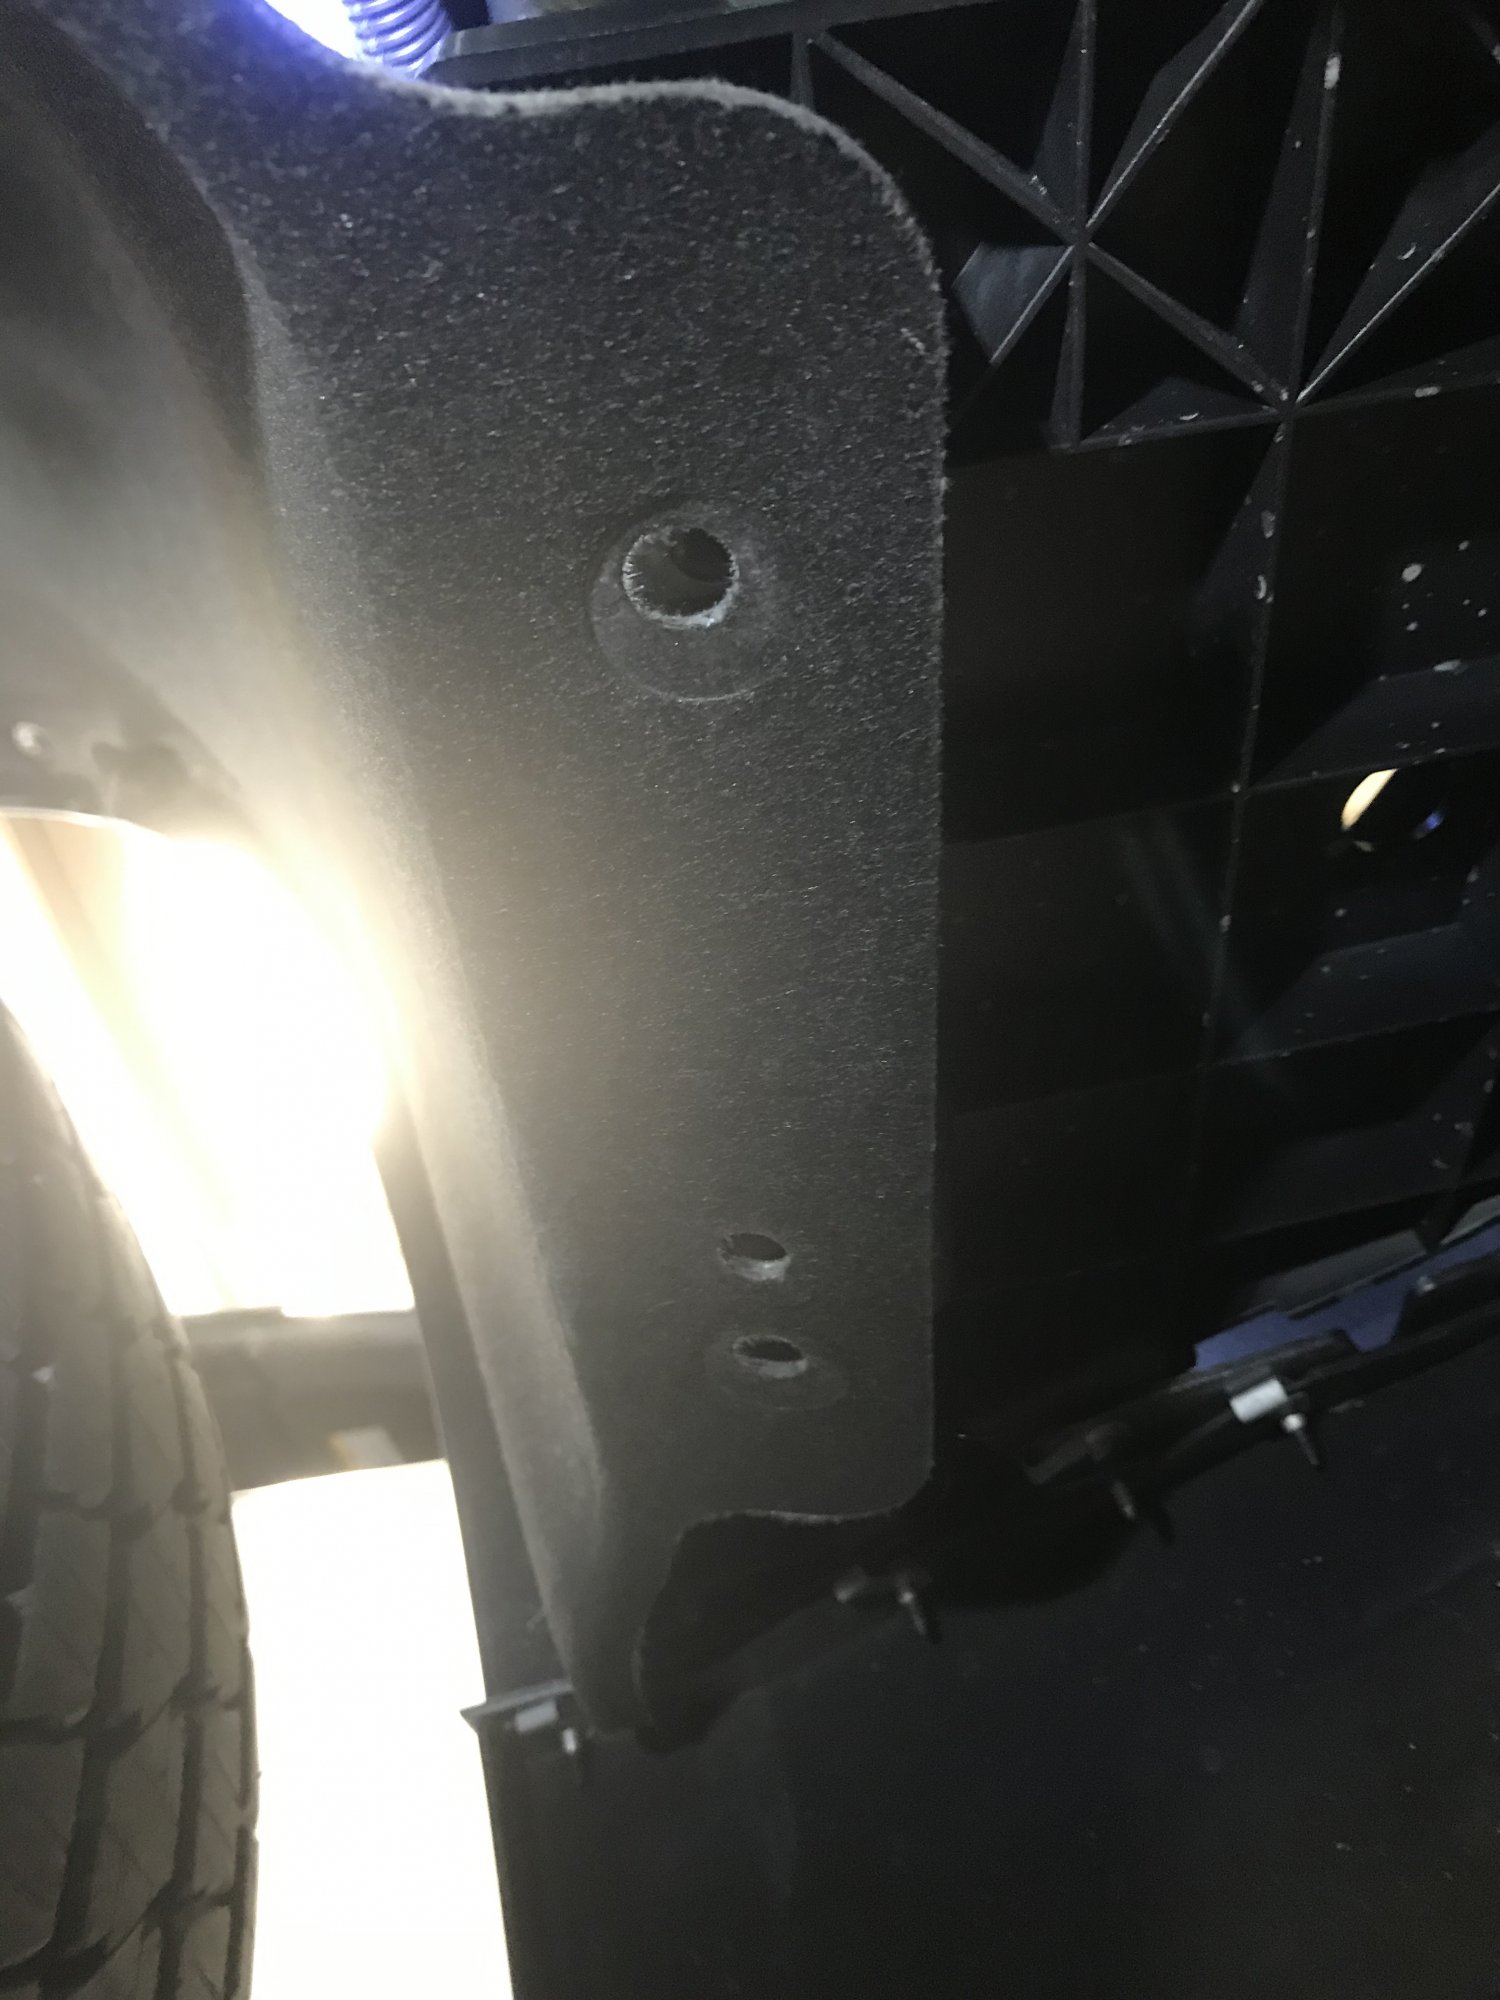
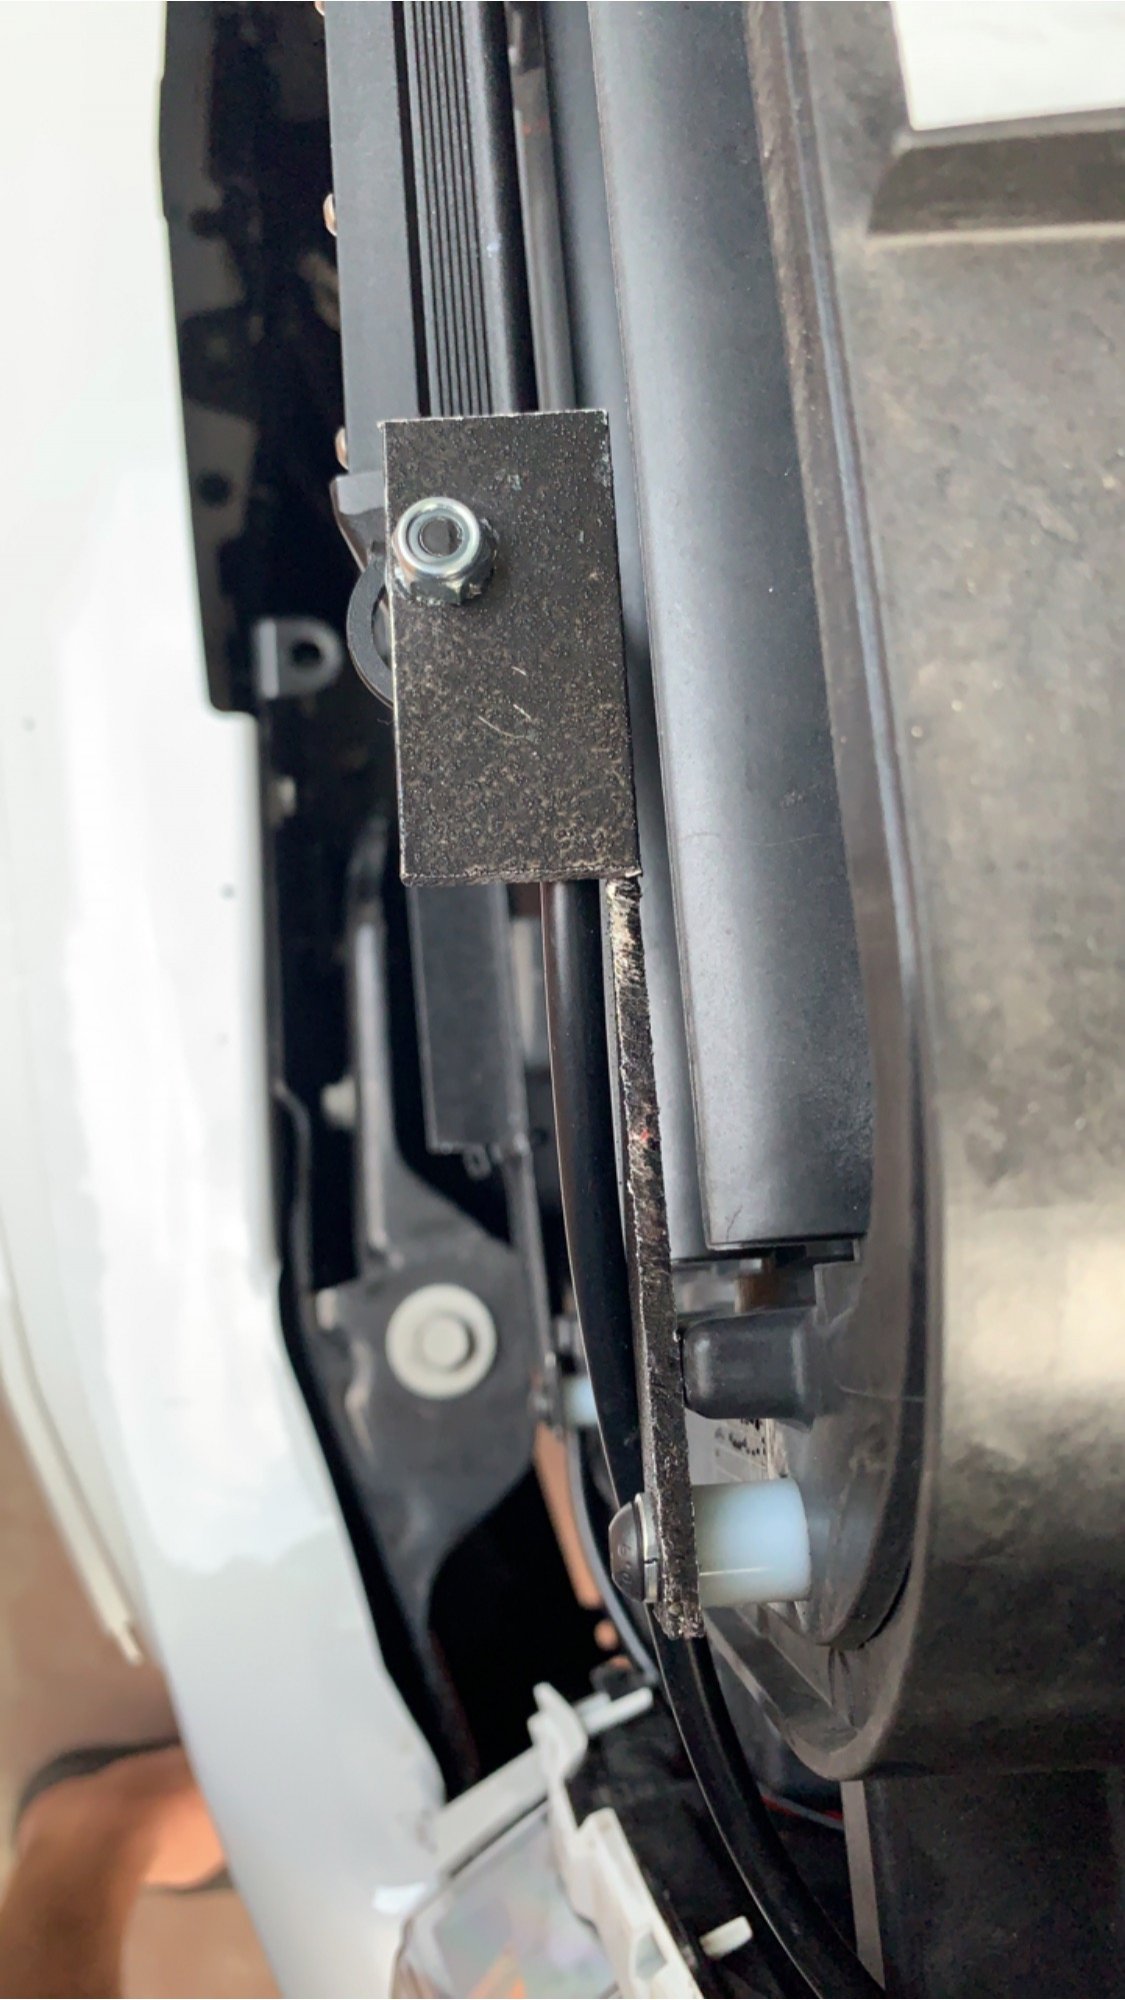
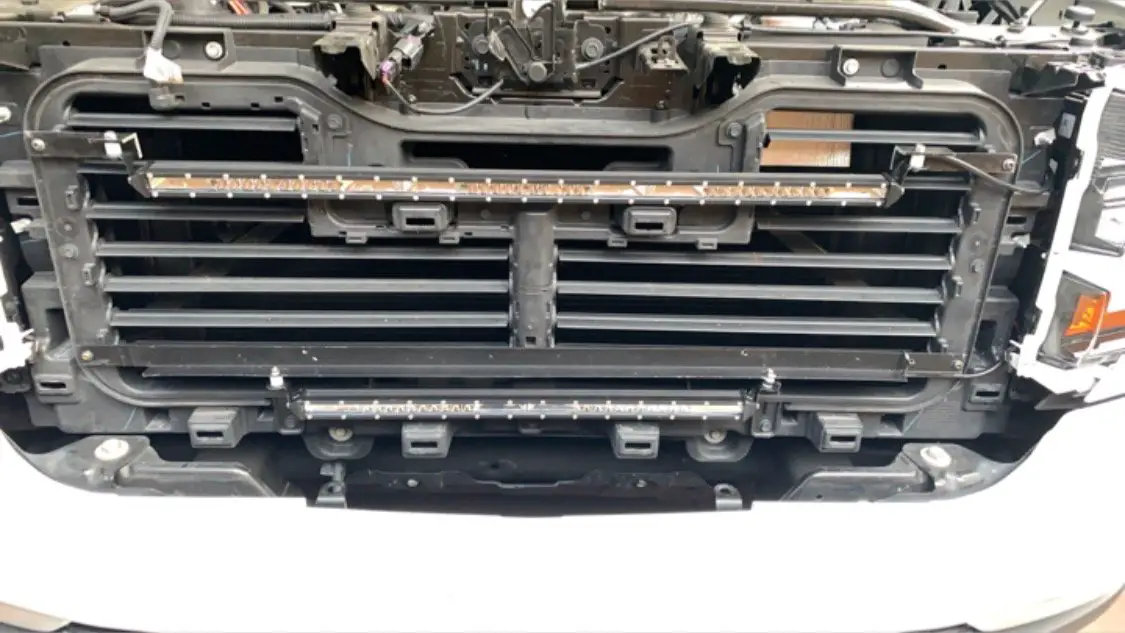
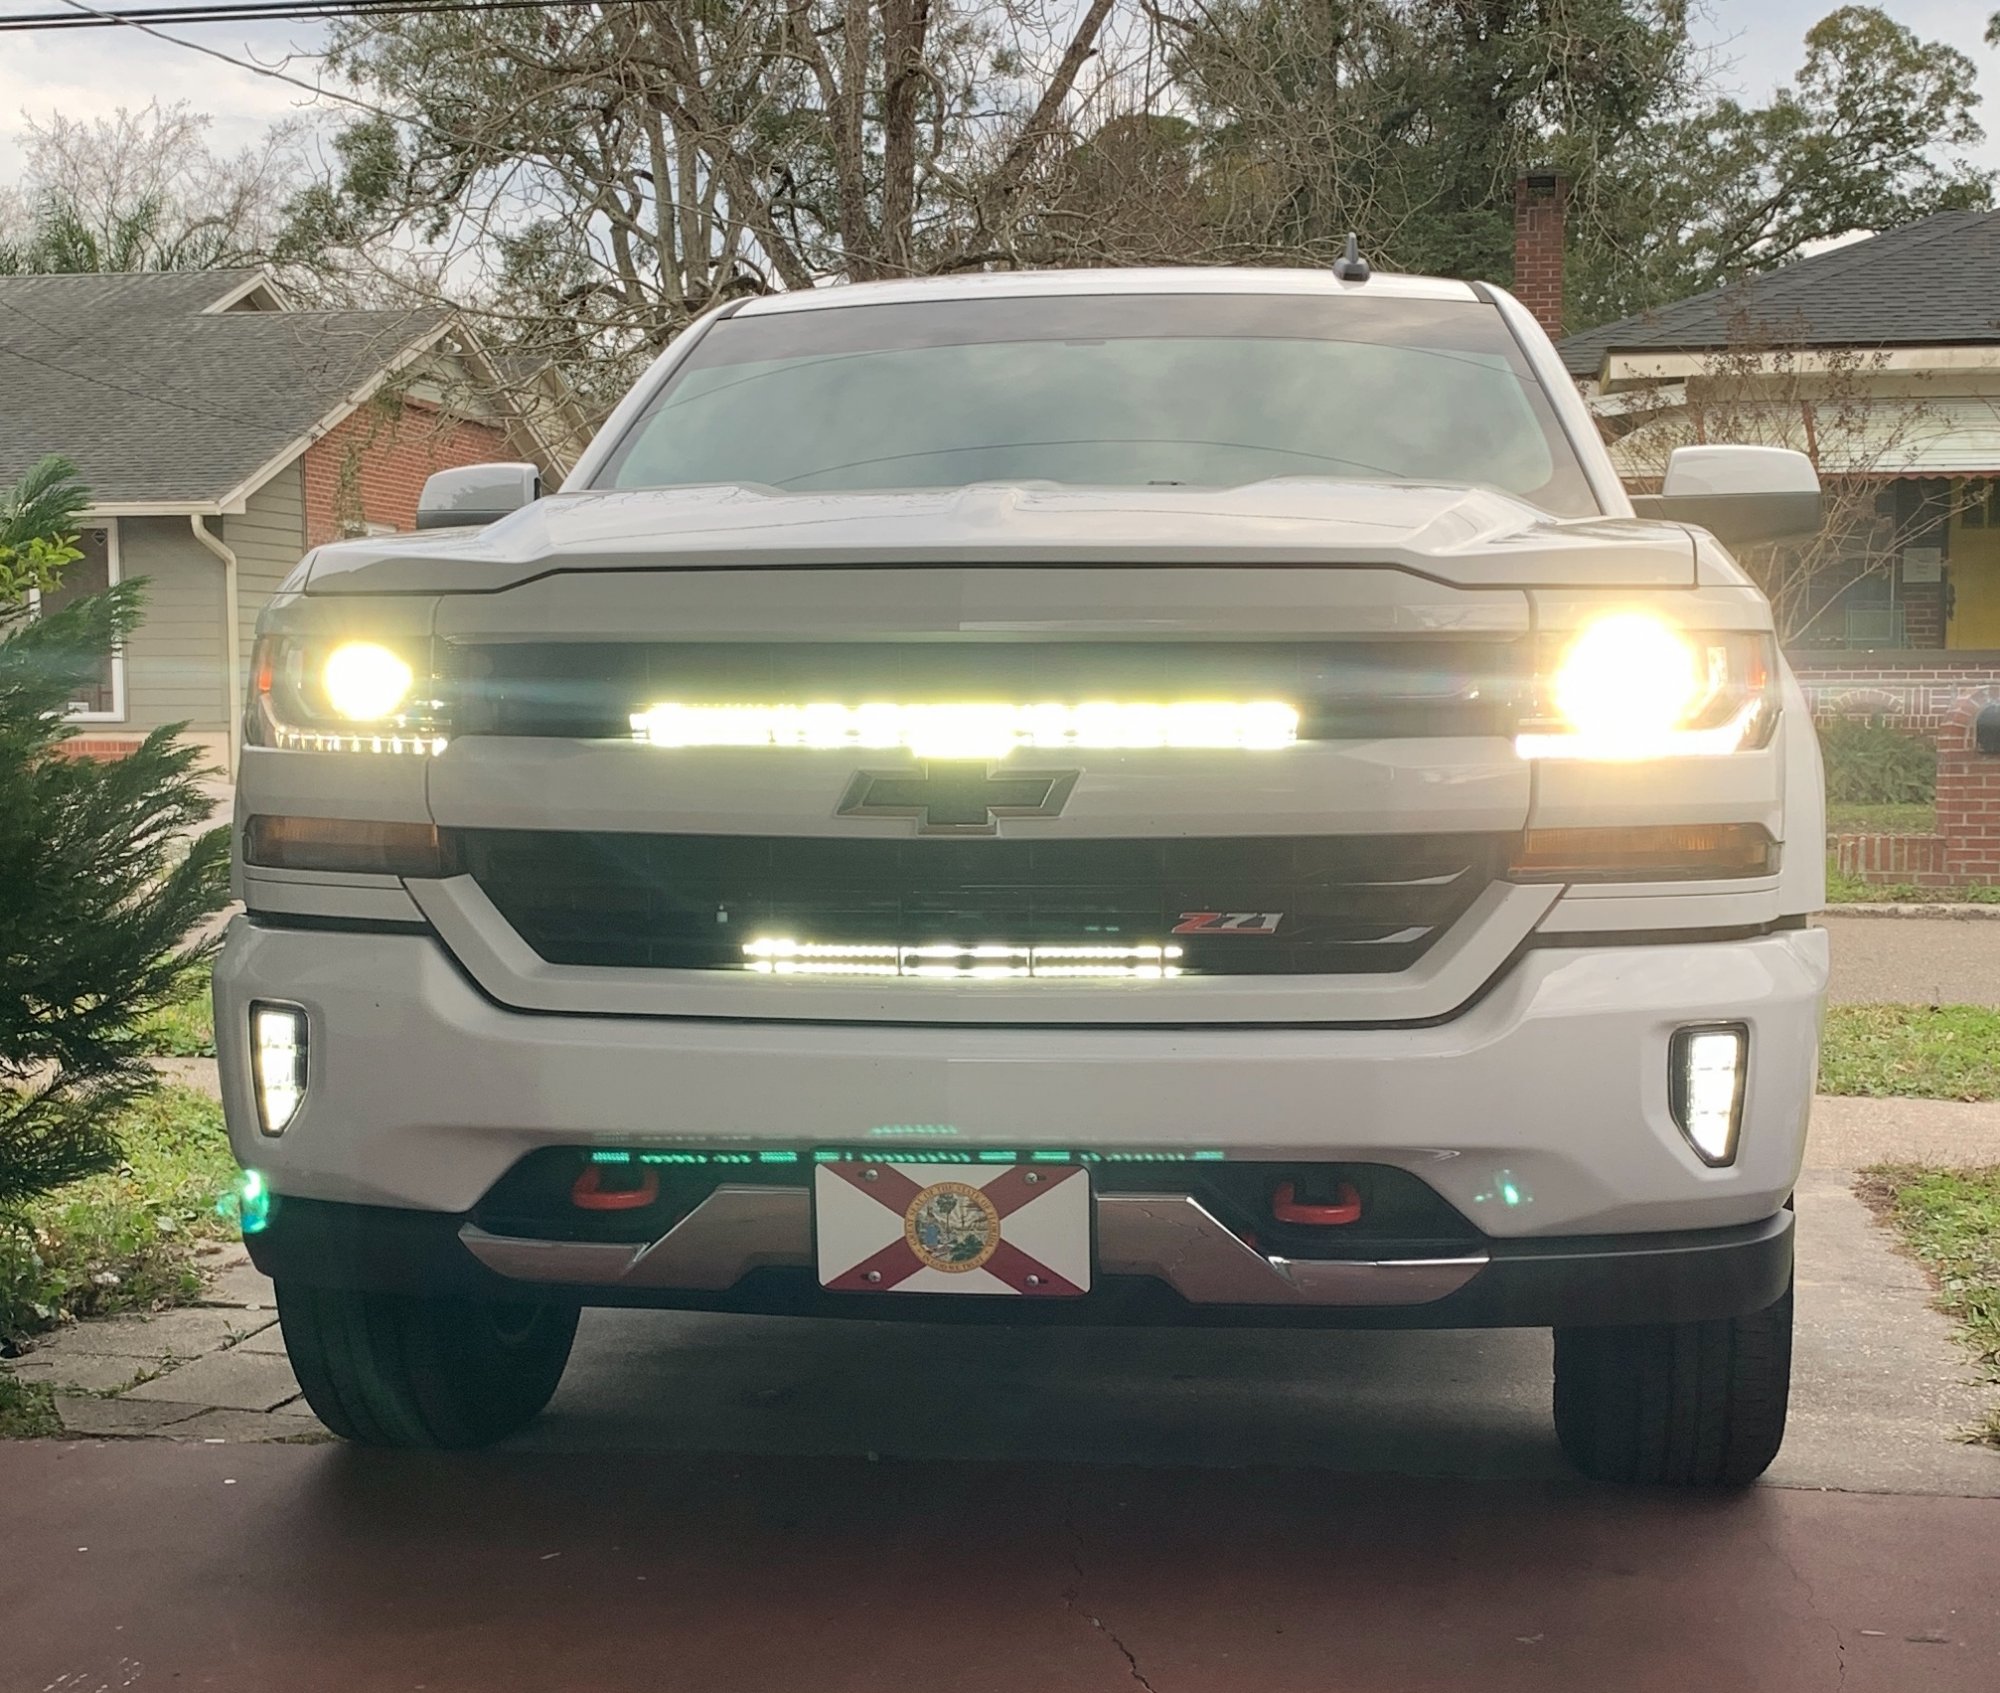
 So the answers I found online all resulted in cutting the active shutters to get this to work so I devised another way. I’m still not happy with the upper bar mounting which is two bars connected to the light but it is mounted and works great. The hardest part of finding a LED light bar that isn’t deep. The one I found on eBay is about the size of an Apple Watch when you look at it from the side. The bracket was just a piece of aluminum angle cut to fit (40”) and painted black. I used 2 of the three holes for the active shutters with a longer button type bolt, spacer, and lock washer. You will need to use spacer to clear the active shutters and to adjust the placement for the light bars. Cost wise I probably spent about $150 total.