Jump to content

What Have You Done With Your T1 Today ?????


Recommended Posts

14 minutes ago, PureZ71 said:

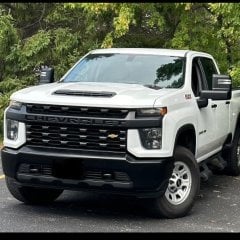
Well unexpected change today. I went to take off the z71 badge to dip is black on the front grill but I snapped it as I was taking it off. So now I just removed it all. Might run it like this for a bit
49bec8bfbe4ad7e18b12a5999060fdee.jpg


Sent from my iPhone using Tapatalk

Why not?   I like it.    But you can get them cheap on ebay or Amazon.  

  • Like 1
Link to comment
Share on other sites

Well unexpected change today. I went to take off the z71 badge to dip is black on the front grill but I snapped it as I was taking it off. So now I just removed it all. Might run it like this for a bit
49bec8bfbe4ad7e18b12a5999060fdee.jpg


Sent from my iPhone using Tapatalk

I bought a matte black metal replacement but haven’t taken the time to replace it. I noticed that the plastic on the factory one was about to snap. I actually like the clean look better. Looks good.


Sent from my iPhone using Tapatalk
Link to comment
Share on other sites


I bought a matte black metal replacement but haven’t taken the time to replace it. I noticed that the plastic on the factory one was about to snap. I actually like the clean look better. Looks good.


Sent from my iPhone using Tapatalk

Yeah I saw one on eBay that I might get.

The problem was that the clip that was supposed hold the badge is what snapped. After that I just pulled the black clip part out by breaking it in half.

bd4a85b8fce628f730cb77ee9df1ca95.jpg


Sent from my iPhone using Tapatalk
Link to comment
Share on other sites

1 hour ago, 2k19Sierra said:

Looks sweet! More details on how you mounted that led bar down low please!

Thanks...   Let me preface this with... I am NOT a fabricator, or at least a professional. I winged this one...  Which is why the upper mounts were made by professionals... LOL.

So,  i notched out a hole with a dremmel or a grinder into the plastic lower.  The plastic melts easily as you grind it.  A little air around it helps with cooling.  I grabbed some alum angle iron from lowes and i had some other metal angle brackets laying around. Basically fabricated a support bracket for the left and right arms of the light to extend further away from the light and rest on the aluminum that runs from the left to the right support for the bumper.  I had to trim the angle brackets for the connection to the light so it didn't look cheesy from the side. Used self taping screws for the metal connections.  


What i love about the light setup is that i ran a 12v wireless remote relay to the battery and the lights into the relay.  I use my overhead homelink to turn on the lights remotely or the remote that came with the relay. No need for wires through the firewall.

Link to relay - https://smile.amazon.com/gp/product/B07XK7D73Q/


led2.jpg

led3.jpg

led5.jpg

led6.jpg

led10.jpg

led11.jpg

led13.jpg

led14.jpg

Edited by jeepincbum11
  • Like 1
Link to comment
Share on other sites

Join the conversation

You can post now and register later. If you have an account, sign in now to post with your account.

Guest
Reply to this topic...

×   Pasted as rich text.   Paste as plain text instead

  Only 75 emoji are allowed.

×   Your link has been automatically embedded.   Display as a link instead

×   Your previous content has been restored.   Clear editor

×   You cannot paste images directly. Upload or insert images from URL.


×
×
  • Create New...

Important Information

By using this site, you agree to our Terms of Use.