Jump to content

Recommended Posts

Posted

Hey everybody...I just now joined the forum just to pass along a decent, easy fix for the "flexing" gas pedal in the 2014-2018 Sierras and Silverados.


I stumbled across this board researching this issue that I discovered on my new (to me) 2017 Silverado Z71 5.3 that I just bought about 4 weeks ago with 788 miles (yeah, seven hundred eighty-eight!) on her.


Upon starting from a stopped position (such as coming off a stop bar at a traffic signal), I was a bit bothered by what I can only describe as a "hesitation" of movement of the truck, where pressure on my right foot on the accelerator that wasn't immediately (and proportionally) resulting in matching acceleration of the vehicle.


This is the same issue described in other posts on this board that has been remedied with (among other things) by placing cut pieces of paint stirring sticks behind the plastic "anchor plate" that is affixed to the firewall, and where the accelerator sensor is bolted on to.


I had plenty of flex in mine, on the order of probably 1/2" to 5/8" at least where the mounting plate would flex and finally "bottom out" against the firewall before the accelerator would begin to respond to input.


The fix I came up with was a pretty simple one, and I wanted to pass it along:


On the black plastic mounting plate (Those of you who have researched this issue probably already are familiar with this piece I'm referring to), near the bottom where the gas pedal mounting bracket is affixed, there is an unused hole to the lower left of the pedal bracket.


I used a 1/4" x 20 bolt (about 1.75" in length) with a nut and washer pre-threaded onto the bolt, and slipped another 1/4" nut on the backside of the black plastic mounting bracket (using 90 degree needle nose pliers to hold nut in place while finger-tightening bolt...this was the most tricky part). This required trimming just a little bit of the floorboard insulation (see photo below) to make it easier inserting the nut behind the plastic piece.


Then I simply tightened the bolt into the nut on the back side, which results in approximately 1/2" or so of the bolt protruding through the backside of the black plastic plate and bottoming out on the firewall. The result is MUCH less flex in the lower portion of that plastic mounting plate when pushing on the accelerator.


I really was skeptical of how much difference this would make, but WOW...after driving it, the difference is NIGHT and DAY! That "dead zone" where I was having to push unnaturally hard on the accelerator pedal before seeing any response from the engine is GONE!  Now I can lightly push on the pedal and the response is IMMEDIATE and smooth!


Attached is a picture showing the finished product (sort of helps what I've tried to describe above). I should have taken a few more pics during the procedure, but I was sort of on a roll and didn't think about taking any until I was finished.


Hopefully this fix comes in handy for others of you having this same issue related to the "spongy" accelerator mounting plate.


Kind of disheartening to have to fix my ~$36K truck with a $0.50 nut and bolt, but at least it fixed my issue!


IMG_5471.JPG

  • Like 4
Posted

That’s look good I need to do it to my 14 gmc 5.3 do you have any more pictures?

Posted

Nice work but check the Search function too.  Lots more info in these existing threads:


Posted (edited)

Hey SK...I did see many of the other posts (before I even registered on the site), some great information around here.


I didn't see any fixes similar to what I had engineered (although some were quite creative), and I wasn't sure which of those other threads to choose to reply to with my "new" fix, thus the fresh topic. :D


Hopefully the mods don't mind too much if this counts as a "duplicate" topic.


Just wanted to pass on what I hope to be useful information onto the masses in the most effective way.

Edited by Badge767
  • Thanks 1
Posted
4 minutes ago, Badge767 said:

Hey SK...I did see many of the other posts (before I even registered on the site), some great information around here.


I didn't see any fixes similar to what I had engineered (although some were quite creative), and I wasn't sure which of those other threads to choose to reply to with my "new" fix, thus the fresh topic. :D


Hopefully the mods don't mind too much if this counts as a "duplicate" topic.


Just wanted to pass what I hope to be useful information onto the masses in the most effective way.

...and some of us thank you very much ?

Posted
On ‎1‎/‎27‎/‎2019 at 2:43 PM, Badge767 said:

Hey everybody...I just now joined the forum just to pass along a decent, easy fix for the "flexing" gas pedal in the 2014-2018 Sierras and Silverados.


I stumbled across this board researching this issue that I discovered on my new (to me) 2017 Silverado Z71 5.3 that I just bought about 4 weeks ago with 788 miles (yeah, seven hundred eighty-eight!) on her.


Upon starting from a stopped position (such as coming off a stop bar at a traffic signal), I was a bit bothered by what I can only describe as a "hesitation" of movement of the truck, where pressure on my right foot on the accelerator that wasn't immediately (and proportionally) resulting in matching acceleration of the vehicle.


This is the same issue described in other posts on this board that has been remedied with (among other things) by placing cut pieces of paint stirring sticks behind the plastic "anchor plate" that is affixed to the firewall, and where the accelerator sensor is bolted on to.


I had plenty of flex in mine, on the order of probably 1/2" to 5/8" at least where the mounting plate would flex and finally "bottom out" against the firewall before the accelerator would begin to respond to input.


The fix I came up with was a pretty simple one, and I wanted to pass it along:


On the black plastic mounting plate (Those of you who have researched this issue probably already are familiar with this piece I'm referring to), near the bottom where the gas pedal mounting bracket is affixed, there is an unused hole to the lower left of the pedal bracket.


I used a 1/4" x 20 bolt (about 1.75" in length) with a nut and washer pre-threaded onto the bolt, and slipped another 1/4" nut on the backside of the black plastic mounting bracket (using 90 degree needle nose pliers to hold nut in place while finger-tightening bolt...this was the most tricky part). This required trimming just a little bit of the floorboard insulation (see photo below) to make it easier inserting the nut behind the plastic piece.


Then I simply tightened the bolt into the nut on the back side, which results in approximately 1/2" or so of the bolt protruding through the backside of the black plastic plate and bottoming out on the firewall. The result is MUCH less flex in the lower portion of that plastic mounting plate when pushing on the accelerator.


I really was skeptical of how much difference this would make, but WOW...after driving it, the difference is NIGHT and DAY! That "dead zone" where I was having to push unnaturally hard on the accelerator pedal before seeing any response from the engine is GONE!  Now I can lightly push on the pedal and the response is IMMEDIATE and smooth!


Attached is a picture showing the finished product (sort of helps what I've tried to describe above). I should have taken a few more pics during the procedure, but I was sort of on a roll and didn't think about taking any until I was finished.


Hopefully this fix comes in handy for others of you having this same issue related to the "spongy" accelerator mounting plate.


Kind of disheartening to have to fix my ~$36K truck with a $0.50 nut and bolt, but at least it fixed my issue!


IMG_5471.JPG

Welcome, congratulations, and thanks for taking the time to shed some new light on an old problem!

Posted
19 hours ago, Badge767 said:

Hey SK...I did see many of the other posts (before I even registered on the site), some great information around here.


I didn't see any fixes similar to what I had engineered (although some were quite creative), and I wasn't sure which of those other threads to choose to reply to with my "new" fix, thus the fresh topic. :D


Hopefully the mods don't mind too much if this counts as a "duplicate" topic.


Just wanted to pass on what I hope to be useful information onto the masses in the most effective way.

Yeah I didn't mean your solution wasn't useful -- thanks for another approach!  I just wanted to share the other threads for other possible fixes too (especially for those who have the "old" accelerator pedal part number).

Posted
4 hours ago, sk said:

Yeah I didn't mean your solution wasn't useful -- thanks for another approach!  I just wanted to share the other threads for other possible fixes too (especially for those who have the "old" accelerator pedal part number).

It's all good! :D


That's the great things about these kinds of forums...for the most part, the folks that put forth the effort to document and post their experiences for the benefit of others can come up with some great ideas and tips!


  • 7 months later...
Posted

I can confirm this new method worked for me! I took my 2017 GMC Yukon to the dealer with the same issue. Said they compared it to the 2019 model and that does the same thing, and that there was nothing they could do for me. 
 

I almost gave up trying to get the but behind the pedal mount. After losing 3 nuts somewhere under the insulation (lol) I finally got it on. And I can confirm this is a easy fix so far. 
 

before I had shoved 2 Allen wrenches behind the pedal mount and used electric tape to hold them there, which worked good too. This way is a lot better lol! 
 

Thank You! 

Posted

Another great thing about this mod is that you don't have to worry about a Formosa termite infestation like you do with the "paint stick" mod!

  • 2 months later...
Posted

Will try this same problem push on pedal and nothing 2015 Sierra 5.3 base model.Had at GM (Preston)and they did not fix.Wii update when I have tried this method thanks.Like u said $40K truck and a 50 cent fix.

  • 1 year later...
Posted
On 1/27/2019 at 2:43 PM, Badge767 said:

Hey everybody...I just now joined the forum just to pass along a decent, easy fix for the "flexing" gas pedal in the 2014-2018 Sierras and Silverados.


I stumbled across this board researching this issue that I discovered on my new (to me) 2017 Silverado Z71 5.3 that I just bought about 4 weeks ago with 788 miles (yeah, seven hundred eighty-eight!) on her.


Upon starting from a stopped position (such as coming off a stop bar at a traffic signal), I was a bit bothered by what I can only describe as a "hesitation" of movement of the truck, where pressure on my right foot on the accelerator that wasn't immediately (and proportionally) resulting in matching acceleration of the vehicle.


This is the same issue described in other posts on this board that has been remedied with (among other things) by placing cut pieces of paint stirring sticks behind the plastic "anchor plate" that is affixed to the firewall, and where the accelerator sensor is bolted on to.


I had plenty of flex in mine, on the order of probably 1/2" to 5/8" at least where the mounting plate would flex and finally "bottom out" against the firewall before the accelerator would begin to respond to input.


The fix I came up with was a pretty simple one, and I wanted to pass it along:


On the black plastic mounting plate (Those of you who have researched this issue probably already are familiar with this piece I'm referring to), near the bottom where the gas pedal mounting bracket is affixed, there is an unused hole to the lower left of the pedal bracket.


I used a 1/4" x 20 bolt (about 1.75" in length) with a nut and washer pre-threaded onto the bolt, and slipped another 1/4" nut on the backside of the black plastic mounting bracket (using 90 degree needle nose pliers to hold nut in place while finger-tightening bolt...this was the most tricky part). This required trimming just a little bit of the floorboard insulation (see photo below) to make it easier inserting the nut behind the plastic piece.


Then I simply tightened the bolt into the nut on the back side, which results in approximately 1/2" or so of the bolt protruding through the backside of the black plastic plate and bottoming out on the firewall. The result is MUCH less flex in the lower portion of that plastic mounting plate when pushing on the accelerator.


I really was skeptical of how much difference this would make, but WOW...after driving it, the difference is NIGHT and DAY! That "dead zone" where I was having to push unnaturally hard on the accelerator pedal before seeing any response from the engine is GONE!  Now I can lightly push on the pedal and the response is IMMEDIATE and smooth!


Attached is a picture showing the finished product (sort of helps what I've tried to describe above). I should have taken a few more pics during the procedure, but I was sort of on a roll and didn't think about taking any until I was finished.


Hopefully this fix comes in handy for others of you having this same issue related to the "spongy" accelerator mounting plate.


Kind of disheartening to have to fix my ~$36K truck with a $0.50 nut and bolt, but at least it fixed my issue!


IMG_5471.JPG

I did the same.  I'd say it took care of about 95% of the flex.  Does yours still flex a little?  Like more on the opposite side of the screw?

  • 3 years later...
Posted

Awesome I will for sure check mine out!! Thanks in advance!

Create an account or sign in to comment

You need to be a member in order to leave a comment

Create an account

Sign up for a new account in our community. It's easy!

Register a new account

Sign in

Already have an account? Sign in here.

Sign In Now
  • Latest Articles

  • Posts

    • Fred was in the fertilized egg business. He had several hundred young pullets, and ten roosters to fertilize the eggs He kept records, and any rooster not performing went into the soup pot and was replaced. This took a lot of time, so he bought some tiny bells and attached them to his roosters. Each bell had a different tone, so he could tell from a distance, which rooster was performing. Now, he could sit on the porch and fill out an efficiency report by just listening to the bells. Fred's favourite rooster, old Butch, was a very fine specimen, but this morning he noticed old Butch's bell hadn't rung at all! When he went to investigate, he saw the other roosters were busy chasing pullets, bells-a-ringing, but the pullets, hearing the roosters coming, would run for cover. To Fred's amazement, old Butch had his bell in his beak, so it couldn't ring. He'd sneak up on a pullet, do his job and walk on to the next one. Fred was so proud of old Butch, he entered him in the City Show and he became an overnight sensation among the judges. The result was the judges not only awarded old Butch the "No Bell Piece Prize," but they also awarded him the "Pulletsurprise" as well. Clearly old Butch was a politician in the making. Who else but a politician could figure out how to win two of the most coveted awards on our planet by being the best at sneaking up on the unsuspecting populace and screwing them when they weren't paying attention. Vote carefully in the next election, you can't always hear the bells.
    • Can someone confirm if the GM order workbench terminal is able to validate a custom build sequence:   1) Initialize the Allocation Base: Open a new vehicle build queue, select the 2026 Chevrolet Suburban 4WD, and pick the High Country (3LZ Preferred Equipment Group).   2) Select the Diesel Powertrain: Go directly to the engine configuration screen and choose RPO code LZ0 (3.0L Duramax Turbo-Diesel). Ensure it maps to the MHS 10-speed automatic transmission.   3) Deploy the Seating Swap: Navigate to the Interior Options screen and enter RPO code ATT to replace the standard captain's chairs with the power-release 60/40 bench seat. Because you are not trying to force a separate luxury or air-suspension bundle, the standard, premium D07 Fixed Floor Console remains active. The system will accept this change immediately without triggering a warning message.   3)Apply Heavy-Duty Hauling Capability: Input RPO code NHT (Max Trailering Package). The commercial terminal will automatically bundle the required trailering hardware and software modules to support the diesel engine's maximum towing capacity.   5) Layer the Premium Tech and Glass: Separately add code C3U (Panoramic Power Sunroof) and code UKL (Super Cruise) to the order screen.   6) Run the Final Validation: Click the "Validate Order" button at the bottom of the interface.
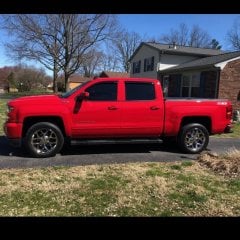
    • Spent the last hour or 2 googling and reading up on the spacer thing. I don't like the loss of thread contact on the slip on spacers, but it appears you can get "extended" lug nuts that reach into the hole of the wheel to get back the lost threads. Looks like the only true hubcentric slip on spacers are at least .375". I'd want as little as I could get away with and don't want to cause other clearance issues going any thicker. Bora seems to offer what appears to be a well made .375" spacer and extended lug nuts. I searched here and did find a couple threads recommending Bora. But not cheap. By the time I buy spacers and lugs, new TPMS sensors, then pay a tire shop to install the new sensors, I suspect I'm going to be in over $400. Thinking about running out and getting some washers to put behind the wheel to see if .375" is enough to clear calipers, turn lock to lock without rubbing, and to see if the wheels/tires look strange pushed out a little. This would just be to check fitment.
    • Roadmaster makes some quality parts; I have their sway bar. I considered the RAS, but I ended up bagging. I didn't know what kind of ride I'd get with RAS, and the bags have interior jounce bumpers, so I can run 0 pounds pressure. I figured I'd have the best of normal suspension ride with assist on-demand. But it seems you got pretty much the same in one item.
  • GM-Trucks.com Clubs

  • Popular Contributors

×
×
  • Create New...